
Rockmeister
TY Advertiser
- Joined
- Feb 7, 2007
- Messages
- 2,185
- Reaction score
- 209
- Points
- 1,383
- Location
- NE Indiana
- Website
- www.yamaheater.com
- Country
- USA
- Snowmobile
- 2007 Attak - LOVE my sled!!!
Spoke with Glen, it appears that the controller is dead due to a failed power control relay.
It was only a matter of time before we saw one fail due to infant mortality.
(We have seen other failures, not many Tg, but a few.
We test all of them multiple times before they go out, however a longtime burn-in is the only thing that can detect what will fail due to infant mortality.)
Fortunately he has a spare he can use, until he gets the replacement from me.!")
It was only a matter of time before we saw one fail due to infant mortality.
(We have seen other failures, not many Tg, but a few.
We test all of them multiple times before they go out, however a longtime burn-in is the only thing that can detect what will fail due to infant mortality.)
Fortunately he has a spare he can use, until he gets the replacement from me.
Rock, Just came home from a week at lake gogebic, 1 night 12 below and 1 night 26 below,It was great having warm hands again without having gauntlets on. You are right on with this system,I have not had warm hands since my srx days. And a big thank you for coming to my shop to solve the early 06 wire colors. Again thanks, Butch
Snow flake
Veteran
Did not do the install yet, I could not wait to go riding and put on 150 miles on Friday and 307 miles on Saturday ! It will have to wait for 2 weeks now!!!!
Swiss Sledder
TY 4 Stroke God
- Joined
- Apr 18, 2003
- Messages
- 2,792
- Reaction score
- 6
- Points
- 816
- Location
- Bidford on Avon, United Kingdom
- Website
- www.mi5.gov.uk
Just got back from a trip where I got to use Rock's controller. I was very impressed. At -20C, they kept my hands quite warm. Thanks Rock!
Rockmeister
TY Advertiser
- Joined
- Feb 7, 2007
- Messages
- 2,185
- Reaction score
- 209
- Points
- 1,383
- Location
- NE Indiana
- Website
- www.yamaheater.com
- Country
- USA
- Snowmobile
- 2007 Attak - LOVE my sled!!!
butch32 said:Rock, Just came home from a week at lake gogebic, 1 night 12 below and 1 night 26 below,It was great having warm hands again without having gauntlets on. You are right on with this system,I have not had warm hands since my srx days. And a big thank you for coming to my shop to solve the early 06 wire colors. Again thanks, Butch
Swiss Sledder said:Just got back from a trip where I got to use Rock's controller. I was very impressed. At -20C, they kept my hands quite warm. Thanks Rock!
You are Very Welcome Guys!

I smile when it's cold out and my own fingers aren't frozen anymore also!

Great shop Butch! Very nice!
Doing my best to make friends with the Queens subjects Swiss! lol
Ohhhh Dude! I NEED some Malteasers!!! Mmmmmmmmmmmm...
Rockmeister
TY Advertiser
- Joined
- Feb 7, 2007
- Messages
- 2,185
- Reaction score
- 209
- Points
- 1,383
- Location
- NE Indiana
- Website
- www.yamaheater.com
- Country
- USA
- Snowmobile
- 2007 Attak - LOVE my sled!!!
APEX/ATTAK Warm Hands Controller Installation

Remove Upper body panel in front of headlight.
Remove Left & Right upper body panels.
Remove trim ring at bottom of steering post.
Remove cowling cover at bottom and in front of bars.

All the connectors/wires you need are inside the large black rubber boot just under the speedometer in the pic above.
(With the exception of Power and Ground.)
Mount Warm Hands Controller(WHC) using supplied heavy duty Ty-wraps to black support bracket on left side above clutches.

Note that a small piece of cork was used to isolate the WHC case from the metal edges of the support bracket.
This helps prevent physical wear through vibration damage to your controller.
Most any cork/rubber/foam material will work good here.
Using this mounting location your controller is well ventilated, wire lengths work out well, and the body panels will clear the installation.
Remove 10mm head bracket mounting bolt under controller, re-install with Black ground wire from controller.

This is the rubber boot covering the connectors/wires you need access to.

Open the rubber boot by removing the re-usable ty-wrap in the center, and releasing the two rubber pins towards the ends.
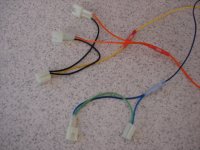
Connectors:
The "Yellowish" connectors are the ones you need.
The smaller 2 Pin connector is the brake light switch connector, it has a Green wire and the Blue/Red wire you need.
(You will NOT connect to the Green wire)
(Can also use Blue/White for the headlight sense, Headlight sense is Blue wire from Controller.)
The Larger connectors with the Yellow/Red and Black wires in, and the two Black wires out are the Grips connectors.
All connectors have a release on the side of them.

If using the Plug&Play kit, simply unplug the small connector with the Blue/Red & Green wires and plug in kit connector with the same color wires.
If not using the Plug&Play kit, install the Blue headlight sense Crimp Tap on the Blue/White or Blue/Red wire.
Plug Blue Headlight sense wire from the WHC into the new Blue Headlight Sense Tap, making sure the spade terminal is inserted correctly.
If using the Plug&Play Kit, simply unplug the two grip connectors, plug the grips into the two connectors from the Plug&Play Harness, plug remaining connector into one of the open connectors from Factory Wiring Harness.
(This will leave one connector from the factory wiring harness open, you will not use.)
If Not using the Plug&Play Kit, locate one of the Yellow/Red wires from the Factory wire harness to the grip connectors.
Trim back outer jacket of harness to expose approximately 4" of Yellow/Red wire(s).
Cut Yellow/Red approximately 2" from connector.
Strip wire ends approximately 3/8".
Tightly twist strands.
Install provided Red FEMALE Snap Connector on Yellow/Red wire FROM factory wiring harness, crimp solid.
Test connection integrity by tugging on connector.
Crimp provided Red MALE Snap Connector on Yellow/Red Wire TO bars.
Test connection integrity by tugging on connector.
(On '07 and up sleds you will not use both Yellow/Red wires from the Factory harness, simply bend last 1/2" of wire not used into tight U shape and slide provided red heat shrink tubing over wire to insulate and heat up to shrink it.)
(Update: I now provide an extra Red FEMALE Snap Connector to put on the unused Yellow/Red Wire From the factory Harness. mThis is used instead of the heatshrink tubing. That way, if you sell your sled in the future, you can remove your YAMAHEATER and simply plug the connectors in and your old sled is same as it came from the factory.
You can then install your YAMAHEATER on your new sled!)
Plug Orange wires from WHC into Male connectors TO grips.
(If using the Plug&Play Kit, you will only use one of the Orange wire connectors from the controller.)
Plug Yellow wire from WHC into Female connector FROM factory wiring harness.
You are finished with Grip/Headlight Wiring!
Final wire to connect is the Red +12v Power connection.
Route wire along existing factory harness under handlebars to Right (non-clutch) side of sled to Red Battery Jump Wire.
Attach Red Power lead to Red Battery Jump lead with 1/2"x1/4-20 Bolt.
A Nylock Stop Nut is highly recommended here, to help prevent loosening due to vibration.

Suggest installing bolt the opposite direction of that shown here, it is easier to get the rubber cover stretched back on.
(Install with end of bolt & nut towards the rubber cover.)
If you are careful about how you install this connection, the rubber cover will stretch right back on and no tape will be required, making for easy access later.
Wiring is completed!
Display LED & Mode Switch Installation:
Locate suitable mounting location for Display LED and Mode Switch.
Drill 1/4" (6.5mm) mounting hole for Switch.
Drill 5/16" (8mm) mounting hole for LED.
Properly route wires to mounting location.

Install LED by inserting LED through mounting hole, pressing LED mount on LED until it "clicks" into place.

(LED will protrude from mount approximately 1/8" when properly inserted.)
Install LED & Mount by pressing on led mount with two fingers into 5/16" mounting hole until fully seated.

Install Mode Switch using provided hardware.
(Red switch cover is removable.)
Testing:
Double-check all connections prior to starting sled.
Start sled & set controls to anything showing 1-10 bars on display.
LED should be green.

Set bars on display to zero using existing handlebar controls.
LED should now be RED indicating full heat to grips.

Wait a couple minutes, bars should be getting nice and toasty warm!
(Grips should definitely be warm by the time the wait Temp light goes out.)
In late spring riding when you may truly want bars to be off, flip Mode Switch to off and the factory "OFF" position will truly be off.)
LED will be off when in true off mode.
After performing system test, shut off sled.
Neatly ty-wrap wires properly in place, keeping wires away from sharp edges, moving parts, and sources of heat.


Pay particular attention to Red Power lead, make sure to ty-wrap properly in place, away from sharp edges etc.
Vibration of any wire is a bad thing, especially against a sharp metal edge.
Ty-wrapping wires together in a bundle, and/or to an existing wire bundle or cable is highly recommended.
Neatness counts here!
Properly re-install Black Rubber Boot over connectors.

Double-check all work and re-install body panels.

Enjoy your Nice Warm Hands!
Rock
Thank You very much to Mike in Warsaw for allowing me to use his sled for these pics!
Remove Upper body panel in front of headlight.
Remove Left & Right upper body panels.
Remove trim ring at bottom of steering post.
Remove cowling cover at bottom and in front of bars.
All the connectors/wires you need are inside the large black rubber boot just under the speedometer in the pic above.
(With the exception of Power and Ground.)
Mount Warm Hands Controller(WHC) using supplied heavy duty Ty-wraps to black support bracket on left side above clutches.
Note that a small piece of cork was used to isolate the WHC case from the metal edges of the support bracket.
This helps prevent physical wear through vibration damage to your controller.
Most any cork/rubber/foam material will work good here.
Using this mounting location your controller is well ventilated, wire lengths work out well, and the body panels will clear the installation.
Remove 10mm head bracket mounting bolt under controller, re-install with Black ground wire from controller.
This is the rubber boot covering the connectors/wires you need access to.
Open the rubber boot by removing the re-usable ty-wrap in the center, and releasing the two rubber pins towards the ends.
Connectors:
The "Yellowish" connectors are the ones you need.
The smaller 2 Pin connector is the brake light switch connector, it has a Green wire and the Blue/Red wire you need.
(You will NOT connect to the Green wire)
(Can also use Blue/White for the headlight sense, Headlight sense is Blue wire from Controller.)
The Larger connectors with the Yellow/Red and Black wires in, and the two Black wires out are the Grips connectors.
All connectors have a release on the side of them.
If using the Plug&Play kit, simply unplug the small connector with the Blue/Red & Green wires and plug in kit connector with the same color wires.
If not using the Plug&Play kit, install the Blue headlight sense Crimp Tap on the Blue/White or Blue/Red wire.
Plug Blue Headlight sense wire from the WHC into the new Blue Headlight Sense Tap, making sure the spade terminal is inserted correctly.
If using the Plug&Play Kit, simply unplug the two grip connectors, plug the grips into the two connectors from the Plug&Play Harness, plug remaining connector into one of the open connectors from Factory Wiring Harness.
(This will leave one connector from the factory wiring harness open, you will not use.)
If Not using the Plug&Play Kit, locate one of the Yellow/Red wires from the Factory wire harness to the grip connectors.
Trim back outer jacket of harness to expose approximately 4" of Yellow/Red wire(s).
Cut Yellow/Red approximately 2" from connector.
Strip wire ends approximately 3/8".
Tightly twist strands.
Install provided Red FEMALE Snap Connector on Yellow/Red wire FROM factory wiring harness, crimp solid.
Test connection integrity by tugging on connector.
Crimp provided Red MALE Snap Connector on Yellow/Red Wire TO bars.
Test connection integrity by tugging on connector.
(On '07 and up sleds you will not use both Yellow/Red wires from the Factory harness, simply bend last 1/2" of wire not used into tight U shape and slide provided red heat shrink tubing over wire to insulate and heat up to shrink it.)
(Update: I now provide an extra Red FEMALE Snap Connector to put on the unused Yellow/Red Wire From the factory Harness. mThis is used instead of the heatshrink tubing. That way, if you sell your sled in the future, you can remove your YAMAHEATER and simply plug the connectors in and your old sled is same as it came from the factory.
You can then install your YAMAHEATER on your new sled!)
Plug Orange wires from WHC into Male connectors TO grips.
(If using the Plug&Play Kit, you will only use one of the Orange wire connectors from the controller.)
Plug Yellow wire from WHC into Female connector FROM factory wiring harness.
You are finished with Grip/Headlight Wiring!
Final wire to connect is the Red +12v Power connection.
Route wire along existing factory harness under handlebars to Right (non-clutch) side of sled to Red Battery Jump Wire.
Attach Red Power lead to Red Battery Jump lead with 1/2"x1/4-20 Bolt.
A Nylock Stop Nut is highly recommended here, to help prevent loosening due to vibration.
Suggest installing bolt the opposite direction of that shown here, it is easier to get the rubber cover stretched back on.
(Install with end of bolt & nut towards the rubber cover.)
If you are careful about how you install this connection, the rubber cover will stretch right back on and no tape will be required, making for easy access later.
Wiring is completed!
Display LED & Mode Switch Installation:
Locate suitable mounting location for Display LED and Mode Switch.
Drill 1/4" (6.5mm) mounting hole for Switch.
Drill 5/16" (8mm) mounting hole for LED.
Properly route wires to mounting location.
Install LED by inserting LED through mounting hole, pressing LED mount on LED until it "clicks" into place.
(LED will protrude from mount approximately 1/8" when properly inserted.)
Install LED & Mount by pressing on led mount with two fingers into 5/16" mounting hole until fully seated.
Install Mode Switch using provided hardware.
(Red switch cover is removable.)
Testing:
Double-check all connections prior to starting sled.
Start sled & set controls to anything showing 1-10 bars on display.
LED should be green.
Set bars on display to zero using existing handlebar controls.
LED should now be RED indicating full heat to grips.
Wait a couple minutes, bars should be getting nice and toasty warm!
(Grips should definitely be warm by the time the wait Temp light goes out.)
In late spring riding when you may truly want bars to be off, flip Mode Switch to off and the factory "OFF" position will truly be off.)
LED will be off when in true off mode.
After performing system test, shut off sled.
Neatly ty-wrap wires properly in place, keeping wires away from sharp edges, moving parts, and sources of heat.
Pay particular attention to Red Power lead, make sure to ty-wrap properly in place, away from sharp edges etc.
Vibration of any wire is a bad thing, especially against a sharp metal edge.
Ty-wrapping wires together in a bundle, and/or to an existing wire bundle or cable is highly recommended.
Neatness counts here!
Properly re-install Black Rubber Boot over connectors.
Double-check all work and re-install body panels.
Enjoy your Nice Warm Hands!
Rock
Thank You very much to Mike in Warsaw for allowing me to use his sled for these pics!

Blue Dave
Lifetime Member
- Joined
- Jan 7, 2008
- Messages
- 2,888
- Reaction score
- 243
- Points
- 1,453
- Location
- Ham Lake, MN
- Country
- USA
- Snowmobile
- '17 Sidewinder LTX DX
For those of you that do not want to cut and splice your Yamaha wiring harness, Rock has this slick "plug & play" kit available. It simply plugs into the warm hands controller connectors that you can see in Rock's picture and then it simply plugs into your stock Yamaha wiring connectors.
I had to cancel my sled trip for this weekend since it is 50 deg F. & sunny!!!! Therefore I will probably kill some time by installing mine today and report on how it went along with some more pics.
I'm just hoping that I will have a chance to try it out yet this season!
I had to cancel my sled trip for this weekend since it is 50 deg F. & sunny!!!! Therefore I will probably kill some time by installing mine today and report on how it went along with some more pics.
I'm just hoping that I will have a chance to try it out yet this season!
Attachments

KevinS
Expert
WOW! Talk about great service. I had a problem with a Code 81 on my 06 Attak using the plug and play harness. Rock called me up and walked me thru exactly what to do over the phone. Had to swap the ground wires between connectors.
Thanks Again Rock!.
Kevin
Thanks Again Rock!.
Kevin
Snow flake
Veteran
Great instructions!
charger0926
Pro
- Joined
- Sep 3, 2008
- Messages
- 197
- Reaction score
- 1
- Points
- 716
- Location
- Elk Grove, CA
- Country
- USA
- Snowmobile
- 2012 nitro mtx 162
rock you have a pm
lucky_7
TY 4 Stroke Guru
Rock, I just completed a 1,000 mile trip in the UP. It was the first time that I rode with your set-up. Everything was working perfect until about 80 miles in when my left handwarmer failed and melted a pin hole through the grip. The right one still works good! Do you think it is a coincidence or is it something that I did with the install?
On a side note, it was -18 one of the days and my right hand (Warmer still working) was perfect. I am kind of a whimp with the cold and was good for 250+ miles of riding.
On a side note, it was -18 one of the days and my right hand (Warmer still working) was perfect. I am kind of a whimp with the cold and was good for 250+ miles of riding.
Superman
TY 4 Stroke Master
- Joined
- Jan 21, 2005
- Messages
- 1,355
- Reaction score
- 14
- Points
- 1,073
- Location
- Gaylord MI
- Website
- www.lakeffectsnow.com
lucky_7 said:Rock, I just completed a 1,000 mile trip in the UP. It was the first time that I rode with your set-up. Everything was working perfect until about 80 miles in when my left handwarmer failed and melted a pin hole through the grip. The right one still works good! Do you think it is a coincidence or is it something that I did with the install?
On a side note, it was -18 one of the days and my right hand (Warmer still working) was perfect. I am kind of a whimp with the cold and was good for 250+ miles of riding.
Lucky I don't think this pin hole was caused by Rocks kit. I had a pinhole in mine at the end of last season is the reason I say this. Mine was also on the left grip. I actually replaced my left grip this year the same night Rock and I installed the warm hands controller on my sled. I'm still kind of baffled as to how I got this pinhole in my grip. My dealer did warranty the grip for me though. All I can come up with is I use one of those hand mirrors that I was wearing accross the hand. I have since changed to wearing the mirror around my wrist. Don't know if this was the cause. But just FYI I did have a pin hole in mine from the previous season.
Rockmeister
TY Advertiser
- Joined
- Feb 7, 2007
- Messages
- 2,185
- Reaction score
- 209
- Points
- 1,383
- Location
- NE Indiana
- Website
- www.yamaheater.com
- Country
- USA
- Snowmobile
- 2007 Attak - LOVE my sled!!!
KevinS said:WOW! Talk about great service. I had a problem with a Code 81 on my 06 Attak using the plug and play harness. Rock called me up and walked me thru exactly what to do over the phone. Had to swap the ground wires between connectors.
Thanks Again Rock!.
Kevin
You are very welcome Kevin!
The '06 Attak/Apex's, and the Phazers have the most wiring variations. I am glad to help you guys get them corrected.
Thanks Dude! Did you get yours in yet?Snow flake said:Great instructions!
Reply sent!charger0926 said:rock you have a pm
lucky_7 said:Rock, I just completed a 1,000 mile trip in the UP. It was the first time that I rode with your set-up. Everything was working perfect until about 80 miles in when my left handwarmer failed and melted a pin hole through the grip. The right one still works good! Do you think it is a coincidence or is it something that I did with the install?
On a side note, it was -18 one of the days and my right hand (Warmer still working) was perfect. I am kind of a whimp with the cold and was good for 250+ miles of riding.
Hey Lucky!
I am sure you did fine with the install! There is next to nothing you could have done to make it fail.
Have seen a few of these. If the warmer has an existing defect that is just on the edge of failing, putting more consistent power into the warmer can make it finally fail (at least sooner).
What most guys have found is a spot where the warmer was "kinked", IE a sharp fold in it from the factory.
This makes a bad connection at that spot & it gets very hot in a small area and finally burns through.
(FYI This is called "Work & Burn" in the electrical industry, the wiring/equipment will work right up until it burns up.)
It is something that will most likely eventually fail, this just made it show up faster.
I have a number of ideas for your grips. For example, the '09 Nytro grip warmers are 1/3rd the cost of the '08 ones. (About $50 ea compared to $150 ea.) (However... unfortunately, the resistance specs on the '09s are higher & therefore colder, not real far from each other, but different.)
Give me a call when you get a chance & I can let you know what I am thinking. (Will post results when completed.)

Best bet is if you have a good relationship(first name basis is best) with your dealer like Superman, they will usually take care of you.
gsxr
TY 4 Stroke Master
- Joined
- Feb 24, 2006
- Messages
- 1,338
- Reaction score
- 62
- Points
- 1,008
- Location
- BRACEBRIDGE , ONTARIO
- Country
- Canada
- Snowmobile
- 2023 SRX
Rock , just came home from 1408 mile ride (2360 km ) , every apex had your box on and all agreed , The first ride with warm hands on all sleds since they where new !!! (even without their gauntlets)
YOU ROCK !!!!
YOU ROCK !!!!
swelly
Lifetime Member
- Joined
- Feb 2, 2009
- Messages
- 497
- Reaction score
- 0
- Points
- 821
- Location
- Anchorage/Seward, AK
- Website
- www.swelltimecharters.com
Rock, Just got done with the Trek Over the Top. The ride from Tok, AK to Dawson City, Yukon Territory. Only 400 miles round trip. But the controller worked awesome. Only one other Nytro on the trip. I had happened to email him the link before the trip. He got to Dawson and wished he would have followed my advice. Temps were -20F to +10. I still used my gauntlets just to keep the wind off the back of my hands when running up to 100mph.
Thanks again,
Thanks again,
Similar threads
- Replies
- 2
- Views
- 2K
- Replies
- 23
- Views
- 4K
- Replies
- 4
- Views
- 35K
-
This site uses cookies to help personalise content, tailor your experience and to keep you logged in if you register.
By continuing to use this site, you are consenting to our use of cookies.