greg.f
Newbie
Has anybody seen the tunnel block off kit that Snow Tech magazine indicated would be available from Yamaha for the 07 and 08 Phazers? It was supposed to have a heat shield and tunnel block off plate. I did not see any posts for it.
Just get yourself a piece of aluminum and cover the hole. Did this myself with aftermarket exhaust and havent any problems since.
Egon
Extreme
Do you mean this one? http://www.ty4stroke.com/viewtopic.php?t=64225
I ordered one yeasterday so I can come back with somments when i get it.
I ordered one yeasterday so I can come back with somments when i get it.
08RTX
Extreme
The Yamaha kit is very nice. Well worth the money. The directions are OK. One of the pieces has the wrong number in the directions. Step #6 tells you to attach Insulator 1, when it should be # 10. It took me a couple of minutes to figure it out. The directions tell you estimated time is 1 hour, but if you work slow, like me, plan on a good 2 hours. I would highly recommend blocking the front hole while you are there. You do not need to take it as far apart as I show in the picture if you are not closing the front hole.
Attachments
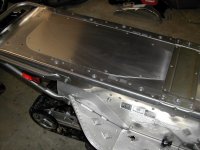
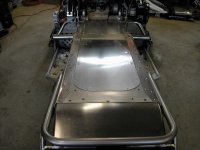
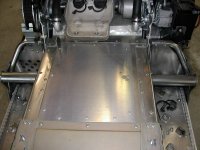


Nice pics!OEM kit took me over 2 hrs also.Would need a angle drill to do it without taking off subframe.Is quite alot of heat shielding included in kit.I never heard of anyone with a plain sheet and no shielding having a issue but for the price I think its worth it to use OEM kit.My front is closed also so maybe extra heat protection is a good idea.Does add a little more wieght back there though.Need to get rid of stock exhaust again.
kamakazie
Veteran
The OEM Kit is definitely worth the money. I installed it and it took about 2 hrs as well. Make sure you have a good rivet gun as the rivets that come with it are tough")
rhino_live
Expert
looks okay to, i think i might get one next year. i'll dump my custom one as it is extreme overkill.
Only thing I didnt like is the block off sheet isnt full width between the corners of existing tunnel.You have to center it and it leaves a 1/4in gap on each side.I agree a AirRivet gun is almost mandatory.
Weapon X
TY 4 Stroke Junkie
thats why I like the excell 50 dolla one and it has louvers cut into it
While I'd love to have a air rivet gun, I find a long handle tool less expensive and works quite well. http://www.northerntool.com/webapp/wcs/ ... _200305349
One of my Phazers has the Excell plate and the other has the 2 hour OEM kit.
One of my Phazers has the Excell plate and the other has the 2 hour OEM kit.
Yammi-Rider
Extreme
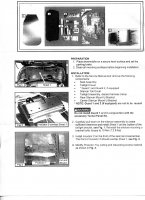
Does anyone have the installation instructions for this kit. I received mine today but no instructions in the box.
08RTX
Extreme
Yammi-Rider,
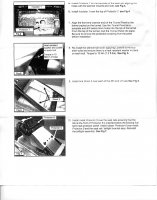
Here is a copy. The quality of the originals from Yamaha was not too good, so I hope these are OK. Remember step 6 should say install Insulator #10, not #1. Somewhat hard to see in the picture. Let me know if you have any questions. Page 1 does not want to attach. I will try again but if if doesn't work, it is just a parts list, warranty info, and caution info.
Here is a copy. The quality of the originals from Yamaha was not too good, so I hope these are OK. Remember step 6 should say install Insulator #10, not #1. Somewhat hard to see in the picture. Let me know if you have any questions. Page 1 does not want to attach. I will try again but if if doesn't work, it is just a parts list, warranty info, and caution info.
Attachments

08RTX
Extreme
Yammi-Rider
Extreme
Thanks very much 08RTX. Really appreciate this. Now I have some work to do. Thanks for the Tip on step 6.
08RTX
Extreme
Yammi-Rider,
No problem. Your are very welcome. I think Yamaha'a directions are actually correct. They say install insulator #1 in step six. If I would have looked at the parts list close enough, item #10 is listed as insulator 1.
No problem. Your are very welcome. I think Yamaha'a directions are actually correct. They say install insulator #1 in step six. If I would have looked at the parts list close enough, item #10 is listed as insulator 1.
Similar threads
- Replies
- 11
- Views
- 1K
- Replies
- 4
- Views
- 2K
- Replies
- 4
- Views
- 4K
- Replies
- 2
- Views
- 497
-
This site uses cookies to help personalise content, tailor your experience and to keep you logged in if you register.
By continuing to use this site, you are consenting to our use of cookies.