Skeeterzx225
Extreme
Quick question, I'm installing ski guides on a new trailer (guides are made by "Raider") they are 5' long and have 6 cutout mounting screw holes predrilled. My question is this, one end of the ski guide has mounting holes about an inch from the end, the other end doesn't have mounting holes until about 12" from the end. Do I install the ends that don't have mounting holes at the front and back of the trailer? Or have them both butt up to each other in the middle of the trailer? Or should I just drill 2 more holes in each guide?
Thx
Thx

grizztracks
Tech Advisor
- Joined
- Feb 24, 2005
- Messages
- 3,110
- Age
- 60
- Location
- Scio, NY
- Country
- USA
- Snowmobile
- FX Nytro RTX, RS Vector, SR Viper RTX SE
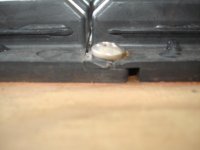
I drilled holes and installed them with the new holes on the ends. When butting the guides together make sure you leave about 1/4 to 1/2" gap for expansion.
Skeeterzx225
Extreme
Thanks for the reply, I wonder why they didn't just add the other holes from the factory? They must be setup that way for a purpose?
Sevey
TY 4 Stroke God
- Joined
- Feb 15, 2011
- Messages
- 1,742
- Location
- Collingwood, ON
- Website
- www.ty4stroke.com
- Country
- Canada
- Snowmobile
- 2018 Sidewinder RTX
It doesn't hurt when screwing them in to make them snug, don't kill them. This allows for a,little play and expansion during the summer.
I had mine super tight and in the summer heat they buckled like crazy and were wavy.
Ms
I had mine super tight and in the summer heat they buckled like crazy and were wavy.
Ms
Skeeterzx225
Extreme
Any ideas on how these are supposed to be installed with only one of the ends not having screw holes? There must be a reason why the factory does this?
yamaha convert
Pro
Skeeterzx225 said:Any ideas on how these are supposed to be installed with only one of the ends not having screw holes? There must be a reason why the factory does this?
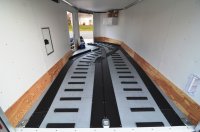
The end that isnt slotted goes to one end of the trailer. Doesnt matter which end you start from. Like others have said the slots allow for expansion. At the slotted end of the guide you just finished laying, the next guide you put down will have its non slotted end facing the slotted one you just put down with a gap for expansion as mentioned here. Continue like this to the other end.
Here's a pic of my layout.
Attachments
Skeeterzx225
Extreme
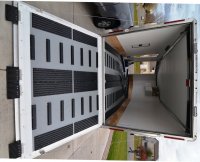
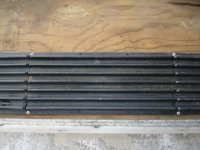
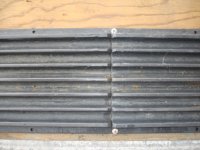
It looks like your guides have 8 screw holes evenly spaced, the guides I have only have 6 screw holes (missing 2 at the end). I'm just worried not having holes at the end will cause it to lift up off the trailer floor and catching on the ski carbide...
Here's my guide, you can see no mounting holes at the top...

Here's my guide, you can see no mounting holes at the top...

Blue Dave
Lifetime Member
- Joined
- Jan 7, 2008
- Messages
- 2,888
- Age
- 60
- Location
- Ham Lake, MN
- Country
- USA
- Snowmobile
- '17 Sidewinder LTX DX
yamaha convert said:Skeeterzx225 said:Any ideas on how these are supposed to be installed with only one of the ends not having screw holes? There must be a reason why the factory does this?
The end that isnt slotted goes to one end of the trailer. Doesnt matter which end you start from. Like others have said the slots allow for expansion. At the slotted end of the guide you just finished laying, the next guide you put down will have its non slotted end facing the slotted one you just put down with a gap for expansion as mentioned here. Continue like this to the other end.
Here's a pic of my layout.
Nice job! I was going to post a pic of my two place enclosed guide layout but now I am embarrassed! LOL!
thinksnow
Expert
Just drill and slot some holes if you are worried about it. I had the same guides and mine had holes on both ends.
yamaha convert
Pro
Skeeterzx225 said:It looks like your guides have 8 screw holes evenly spaced, the guides I have only have 6 screw holes (missing 2 at the end). I'm just worried not having holes at the end will cause it to lift up off the trailer floor and catching on the ski carbide...
Here's my guide, you can see no mounting holes at the top...
I see what you mean.
I would drill the two holes at the end where there arent any. I checked the ones I have and they are are about 1' in from the end. You want these ends to be facing the the trailer ramp and preferably the ramp you come in from most. With my trailer I drive in the rear and out the front so the ends without the holes drilled all face the back of the trailer. By having the screw near the end the chances of the guides lifting are very loe. On the other end you will be just gliding over so there isnt a need for screws near the end. If you load from both ramps then this isnt so simple.
Regardless you dont want to drill extra holes at the other end as the guides have to be able to expand. If your really concerned that theres nothing holding down the other end because its so far from any screws you can shorten the end so that the guide end is closer to the screw in the slot. Although this will work, its wastefull, especially when these guides arent exactly cheap to buy.
yamaha convert
Pro
Blue Dave said:yamaha convert said:Skeeterzx225 said:Any ideas on how these are supposed to be installed with only one of the ends not having screw holes? There must be a reason why the factory does this?
The end that isnt slotted goes to one end of the trailer. Doesnt matter which end you start from. Like others have said the slots allow for expansion. At the slotted end of the guide you just finished laying, the next guide you put down will have its non slotted end facing the slotted one you just put down with a gap for expansion as mentioned here. Continue like this to the other end.
Here's a pic of my layout.
Nice job! I was going to post a pic of my two place enclosed guide layout but now I am embarrassed! LOL!
Thanks Dave
It was a lot of messing around and emptied my piggy bank

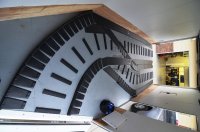
I drove a sled in and out repeatedly to get it to work best. The sleds on the right (it fits one behind the other on that side) drive straight out the front, but with the one on the left, if you dont reverse out, you have to lift the back over a little when your going out the front. There was no other way without getting a longer trailer unfortunately. Trailer is a 16ft box with a 7ft V.
Heres a couple more pics. I dont have a pic of the front ramp.
Attachments
Skeeterzx225
Extreme
I see what you mean. I would drill the two holes at the end where there arent any. I checked the ones I have and they are are about 1' in from the end. You want these ends to be facing the the trailer ramp and preferably the ramp you come in from most. With my trailer I drive in the rear and out the front so the ends without the holes drilled all face the back of the trailer. By having the screw near the end the chances of the guides lifting are very loe. On the other end you will be just gliding over so there isnt a need for screws near the end. If you load from both ramps then this isnt so simple. Regardless you dont want to drill extra holes at the other end as the guides have to be able to expand. If your really concerned that theres nothing holding down the other end because its so far from any screws you can shorten the end so that the guide end is closer to the screw in the slot. Although this will work said:I have a single place Floe tilt trailer i'm installing them on...
Skeeterzx225
Extreme
I see what you mean. I would drill the two holes at the end where there arent any. I checked the ones I have and they are are about 1' in from the end. You want these ends to be facing the the trailer ramp and preferably the ramp you come in from most. With my trailer I drive in the rear and out the front so the ends without the holes drilled all face the back of the trailer. By having the screw near the end the chances of the guides lifting are very loe. On the other end you will be just gliding over so there isnt a need for screws near the end. If you load from both ramps then this isnt so simple. Regardless you dont want to drill extra holes at the other end as the guides have to be able to expand. If your really concerned that theres nothing holding down the other end because its so far from any screws you can shorten the end so that the guide end is closer to the screw in the slot. Although this will work said:I have a single place Floe tilt trailer i'm installing them on...I think the best way to install them would be to have both ends with the new holes I'll drill to butt up against each other in the middle of the trailer, that way they can expand towards the ends if needed..
Blue Dave
Lifetime Member
- Joined
- Jan 7, 2008
- Messages
- 2,888
- Age
- 60
- Location
- Ham Lake, MN
- Country
- USA
- Snowmobile
- '17 Sidewinder LTX DX
yamaha convert said:Blue Dave said:yamaha convert said:Skeeterzx225 said:Any ideas on how these are supposed to be installed with only one of the ends not having screw holes? There must be a reason why the factory does this?
The end that isnt slotted goes to one end of the trailer. Doesnt matter which end you start from. Like others have said the slots allow for expansion. At the slotted end of the guide you just finished laying, the next guide you put down will have its non slotted end facing the slotted one you just put down with a gap for expansion as mentioned here. Continue like this to the other end.
Here's a pic of my layout.
Nice job! I was going to post a pic of my two place enclosed guide layout but now I am embarrassed! LOL!
Thanks Dave
It was a lot of messing around and emptied my piggy bank
I drove a sled in and out repeatedly to get it to work best. The sleds on the right (it fits one behind the other on that side) drive straight out the front, but with the one on the left, if you dont reverse out, you have to lift the back over a little when your going out the front. There was no other way without getting a longer trailer unfortunately. Trailer is a 16ft box with a 7ft V.
Heres a couple more pics. I dont have a pic of the front ramp.
Very nice indeed! I can appreciate the time that you spent laying out and installing your guides. My 10' two place tilt trailer with a cap (drive on back off) was certainly a much easier job!
I went with Injection Plastics ski guides http://www.injectionplasticsmfg.com/products.asp which are 15" long. (I used 28 of them on my trailer.) There are no holes at one end of each section because they are designed to overlap each other slightly. One end of each section is relieved on the top side and the other end is relieved on the bottom side.
The overlapping end of each section has the holes at the end so it secures down the end of the other section that it overlaps which does not have screws in the end. I also installed "Ez Load" ramps at the end of my trailer deck to help the sled over the end of the trailer deck when tilted especially when not on level ground. Here are some pics of my much less impressive set-up LOL!
Attachments

yamaha convert
Pro
Blue Dave said:yamaha convert said:Blue Dave said:yamaha convert said:Skeeterzx225 said:Any ideas on how these are supposed to be installed with only one of the ends not having screw holes? There must be a reason why the factory does this?
The end that isnt slotted goes to one end of the trailer. Doesnt matter which end you start from. Like others have said the slots allow for expansion. At the slotted end of the guide you just finished laying, the next guide you put down will have its non slotted end facing the slotted one you just put down with a gap for expansion as mentioned here. Continue like this to the other end.
Here's a pic of my layout.
Nice job! I was going to post a pic of my two place enclosed guide layout but now I am embarrassed! LOL!
Thanks Dave
It was a lot of messing around and emptied my piggy bank
I drove a sled in and out repeatedly to get it to work best. The sleds on the right (it fits one behind the other on that side) drive straight out the front, but with the one on the left, if you dont reverse out, you have to lift the back over a little when your going out the front. There was no other way without getting a longer trailer unfortunately. Trailer is a 16ft box with a 7ft V.
Heres a couple more pics. I dont have a pic of the front ramp.
Very nice indeed! I can appreciate the time that you spent laying out and installing your guides. My 10' two place tilt trailer with a cap (drive on back off) was certainly a much easier job!
I went with Injection Plastics ski guides http://www.injectionplasticsmfg.com/products.asp which are 15" long. (I used 28 of them on my trailer.) There are no holes at one end of each section because they are designed to overlap each other slightly. One end of each section is relieved on the top side and the other end is relieved on the bottom side.
The overlapping end of each section has the holes at the end so it secures down the end of the other section that it overlaps which does not have screws in the end. I also installed "Ez Load" ramps at the end of my trailer deck to help the sled over the end of the trailer deck when tilted especially when not on level ground. Here are some pics of my much less impressive set-up LOL!
Dave
I bought my guides from Caliber http://www.caliberproductsinc.com/snowm ... cessories/
Being local in MN they were good enough to allow me access to their products at their warehouse, and then I had to order from their supplier. I drove my trailer to their warehouse and they gave me ideas and product to look at so I could make the best choice. Was a huge help being able to view the goods before ordering.
Calvin was the name of the sales guy I dealt with. He was extremely helpful.
Similar threads
- Replies
- 4
- Views
- 2K
-
This site uses cookies to help personalise content, tailor your experience and to keep you logged in if you register.
By continuing to use this site, you are consenting to our use of cookies.