rxrider
Jan-Ove Pedersen
- Joined
- Apr 25, 2003
- Messages
- 7,356
- Age
- 59
- Location
- Lakselv - 70N & 25E
- Country
- Norway
- Snowmobile
- 2014 Phazer XTX, 2013 Phazer RTX, 2008 Apex RTX, 2007 Warrior, 2006 Attak
UPDATE - November 18. - Installing the SuperTips clutch weights, more cleaning of the primary clutch.
Brought beer into the garage nothing much done today except opening beer cans. Well I managed to do something after all.
Work done:
- Installed SuperTips, spring and cover.
- Cleaned primary clutch, man it was dirty.
- Looked at the track to tunnel protector clearance, with the proaction I have only a 3 mm or 1/8"clearance.
With only 1/8" track to tunnel protector clearance with the proaction, will it be even worse with the ZX-2 installed. Anyone with the ZX-2 installed please chime in.
Still waiting for the backordered bushing.
Brought beer into the garage
nothing much done today except opening beer cans. Well I managed to do something after all. Work done:
- Installed SuperTips, spring and cover.
- Cleaned primary clutch, man it was dirty.
- Looked at the track to tunnel protector clearance, with the proaction I have only a 3 mm or 1/8"clearance.
With only 1/8" track to tunnel protector clearance with the proaction, will it be even worse with the ZX-2 installed. Anyone with the ZX-2 installed please chime in.
Still waiting for the backordered bushing.
Attachments


1CrazySledder
Lifetime Member
- Joined
- Aug 11, 2005
- Messages
- 2,006
- Location
- Cartersville, GA.
- Country
- USA
- Snowmobile
- None, looking now!
I do not have the new zx2, however I may have a solution for ya.
When I installed my Expert into my 06, I had the holes in the tunnel 1/2" lower than the specs said in the rear mounts. This gave me plenty of clearance of the protectors to run studs and to avoid the track rubbing when ballooning.
1/8" would worry me. That track is going to rub all the time. Especially under braking or at high speeds??????
rxrider
Jan-Ove Pedersen
- Joined
- Apr 25, 2003
- Messages
- 7,356
- Age
- 59
- Location
- Lakselv - 70N & 25E
- Country
- Norway
- Snowmobile
- 2014 Phazer XTX, 2013 Phazer RTX, 2008 Apex RTX, 2007 Warrior, 2006 Attak
You're right. Thank you for your advice on lowered mounting holes. My track has been rubbing ever since I lowered the tunnel protectors some to fit underneat the MCXpress charge tube. The kit calls for removal of the left side tunnel protector, this can't be done when running studs (144 - 2+4+2+4 pattern). I can tell it's rubbing cause the track lugs have worn where the tunnel protectors have been in contact with the track lugs.
rxrider
Jan-Ove Pedersen
- Joined
- Apr 25, 2003
- Messages
- 7,356
- Age
- 59
- Location
- Lakselv - 70N & 25E
- Country
- Norway
- Snowmobile
- 2014 Phazer XTX, 2013 Phazer RTX, 2008 Apex RTX, 2007 Warrior, 2006 Attak
I got the ZX-2 delivered at my door this morning !")
It's going in this week I hope.
Now on to opening the package, it's x-mas early this year for dad hahaha, now wife and kids want packages too :ORC

It's going in this week I hope.
Now on to opening the package, it's x-mas early this year for dad hahaha, now wife and kids want packages too :ORC
1CrazySledder
Lifetime Member
- Joined
- Aug 11, 2005
- Messages
- 2,006
- Location
- Cartersville, GA.
- Country
- USA
- Snowmobile
- None, looking now!
Looks like it had a rough trip. Hope everything is good.
Can't wait to see it installed on that sled of yours.
Can't wait to see it installed on that sled of yours.
rxrider
Jan-Ove Pedersen
- Joined
- Apr 25, 2003
- Messages
- 7,356
- Age
- 59
- Location
- Lakselv - 70N & 25E
- Country
- Norway
- Snowmobile
- 2014 Phazer XTX, 2013 Phazer RTX, 2008 Apex RTX, 2007 Warrior, 2006 Attak
It sure had a bumpy ride, going out to open the package soon, I hope there is no damaged to it.
1CrazySledder - you're up early, at work already?
1CrazySledder - you're up early, at work already?
1CrazySledder
Lifetime Member
- Joined
- Aug 11, 2005
- Messages
- 2,006
- Location
- Cartersville, GA.
- Country
- USA
- Snowmobile
- None, looking now!
I'm a third shifter.. so yeah, at work. lol
I'm on here at all different times of the day. Usually around 2-3 times a day. Yeah, I have a sickness, I know. lol
-1CS
I'm on here at all different times of the day. Usually around 2-3 times a day. Yeah, I have a sickness, I know. lol
-1CS
kinger
VIP Member
Loosk great, be careful on messing with the geometry of the skid re: lowering the mounting holes. With the 2 shock rear arm and nothing on the front I think its more sensitive then most.
Also Jeff at AD said 1/8" clearance is perfect and on spec.
Also Jeff at AD said 1/8" clearance is perfect and on spec.
rxrider
Jan-Ove Pedersen
- Joined
- Apr 25, 2003
- Messages
- 7,356
- Age
- 59
- Location
- Lakselv - 70N & 25E
- Country
- Norway
- Snowmobile
- 2014 Phazer XTX, 2013 Phazer RTX, 2008 Apex RTX, 2007 Warrior, 2006 Attak
1crazysledder - I have unwrapped the ZX-2 and all is well, only the outer cardboard was damaged, not a scratch on the the ZX-2 or any other part ")
kinger - thanks for your advice, makes perfect sense, if one should lower the rear mounting holes, then the front mounting hole should move too, how much I don't know.
Going out to start assemby of the ZX-2 tonight, will take pics as parts are going in.
kinger - thanks for your advice, makes perfect sense, if one should lower the rear mounting holes, then the front mounting hole should move too, how much I don't know.
Going out to start assemby of the ZX-2 tonight, will take pics as parts are going in.
rxrider
Jan-Ove Pedersen
- Joined
- Apr 25, 2003
- Messages
- 7,356
- Age
- 59
- Location
- Lakselv - 70N & 25E
- Country
- Norway
- Snowmobile
- 2014 Phazer XTX, 2013 Phazer RTX, 2008 Apex RTX, 2007 Warrior, 2006 Attak
UPDATE - November 22. - ZX-2 136" assembly.
The ZX-2 is now assembled. Installing the mount kit remains.
Parts unveiled.

I did not get the install manual for the base skid assembly, but I decided to move on assembling it anyway. Here's a description of the assembly of the ZX-2 136"
I started with the install of the larger of the small idler wheels in front of the skid. Removed the bolts, washers and spacers, placed the wheels onto the spacers, installed the bolt and washers. OBS the larger of the small idler wheels goes in the front of the skid, the smaller wheels goes in the middle of the skid.

Next was the install of the dual G-Force shocks assembly. Removed the bolts, washers, spacers and aluminum cross axle between the rails. Also removed the rear swing arm cross axle. I aligned the upper shock eye and moved the cross axle into place, then I moved the aluminum lower cross axle into position in the lower shock eye, installed the spacer into the smaller of the small idler wheels and aligned the hole in the skid with the cross axel and installed the bolt and washer from both sides. I did use some blue LockTite on all bolts that are not supposed to come off any time soon and tightened them.

Next step was installing of the 121" to 136" ZXtend rail extension kit. First step was to remove the rear axel and the two center rear wheels. Second I had to take off the track tensioner from the base skid and install them into the ZXtend extensions. Then I slided the ZXtends into the slider, I had to use a hammer tapping the end of the ZXtend carefully to get it into place properly.

With the ZXtends in place I started the install of the ZXtend reinforcement plates. Two pices of cast aluminum plates that goes in from both sides of each rail, partly in the hole where the tensioner used to be and partly into the ZXtend rail extension. I then added the 3 small bolts for alignment of the ZXtend, holes are precut into the rails, Zxtends and ZXtend reinforcement plates so no drilling needed. With both ZXtends and plates mounted with the small bolts, I added blue LockTite and tightened them to spec, 9Nm. Next step was to drill out a 10 mm hole in the rails, hole is precut in the ZXtend reinforcement plates but not in the rails. When done I installed the 10 mm bolts, added blue locktite and tightened to spec, 34Nm.

Next was to cut down the sliders to fit the rails. I cut the sliders at the same angle as the end of the skid, about 45 degree. No way the track can hook up the sliders when going in reverse. Then I went on with installing the rear axle and the two center wheels, I took them out as one piece so reinstall was easy. After aligning the center wheel axel with the track tensioners and installing the spaces into the outer rear axel wheels, I installed the bolts and washers. I tighten the bolts finger tight cause the track will need adjustments when skid is in place under the sled.

Assembling my 136" ZX-2 is done.

Tomorrow I will start installing the skid mounting kit to the tunnel. Can't wait to ride it
The ZX-2 is now assembled. Installing the mount kit remains.
Parts unveiled.
I did not get the install manual for the base skid assembly, but I decided to move on assembling it anyway. Here's a description of the assembly of the ZX-2 136"
I started with the install of the larger of the small idler wheels in front of the skid. Removed the bolts, washers and spacers, placed the wheels onto the spacers, installed the bolt and washers. OBS the larger of the small idler wheels goes in the front of the skid, the smaller wheels goes in the middle of the skid.
Next was the install of the dual G-Force shocks assembly. Removed the bolts, washers, spacers and aluminum cross axle between the rails. Also removed the rear swing arm cross axle. I aligned the upper shock eye and moved the cross axle into place, then I moved the aluminum lower cross axle into position in the lower shock eye, installed the spacer into the smaller of the small idler wheels and aligned the hole in the skid with the cross axel and installed the bolt and washer from both sides. I did use some blue LockTite on all bolts that are not supposed to come off any time soon and tightened them.
Next step was installing of the 121" to 136" ZXtend rail extension kit. First step was to remove the rear axel and the two center rear wheels. Second I had to take off the track tensioner from the base skid and install them into the ZXtend extensions. Then I slided the ZXtends into the slider, I had to use a hammer tapping the end of the ZXtend carefully to get it into place properly.
With the ZXtends in place I started the install of the ZXtend reinforcement plates. Two pices of cast aluminum plates that goes in from both sides of each rail, partly in the hole where the tensioner used to be and partly into the ZXtend rail extension. I then added the 3 small bolts for alignment of the ZXtend, holes are precut into the rails, Zxtends and ZXtend reinforcement plates so no drilling needed. With both ZXtends and plates mounted with the small bolts, I added blue LockTite and tightened them to spec, 9Nm. Next step was to drill out a 10 mm hole in the rails, hole is precut in the ZXtend reinforcement plates but not in the rails. When done I installed the 10 mm bolts, added blue locktite and tightened to spec, 34Nm.
Next was to cut down the sliders to fit the rails. I cut the sliders at the same angle as the end of the skid, about 45 degree. No way the track can hook up the sliders when going in reverse. Then I went on with installing the rear axle and the two center wheels, I took them out as one piece so reinstall was easy. After aligning the center wheel axel with the track tensioners and installing the spaces into the outer rear axel wheels, I installed the bolts and washers. I tighten the bolts finger tight cause the track will need adjustments when skid is in place under the sled.
Assembling my 136" ZX-2 is done.
Tomorrow I will start installing the skid mounting kit to the tunnel. Can't wait to ride it
Nice step by step pictures. I can't wait to get mine.
rxrider
Jan-Ove Pedersen
- Joined
- Apr 25, 2003
- Messages
- 7,356
- Age
- 59
- Location
- Lakselv - 70N & 25E
- Country
- Norway
- Snowmobile
- 2014 Phazer XTX, 2013 Phazer RTX, 2008 Apex RTX, 2007 Warrior, 2006 Attak
Thanks Jigger - Got mine yesterday and did the assembly of the skid right away. Going to install the mounting kit into the tunnel today.
You have 9200 km on a RX-1 Mountain, awesome, that's a lot for a mountain sled, ... you're from Ontario, then you're doing both trail and powder riding I guess. I'm close to 10000 km on my '03 turbo sled.
You have 9200 km on a RX-1 Mountain, awesome, that's a lot for a mountain sled, ... you're from Ontario, then you're doing both trail and powder riding I guess. I'm close to 10000 km on my '03 turbo sled.
Looks like early christmas in Lakselv!!!!!!!!!!!!! Keep the pics coming on the install of the skid.
rxrider
Jan-Ove Pedersen
- Joined
- Apr 25, 2003
- Messages
- 7,356
- Age
- 59
- Location
- Lakselv - 70N & 25E
- Country
- Norway
- Snowmobile
- 2014 Phazer XTX, 2013 Phazer RTX, 2008 Apex RTX, 2007 Warrior, 2006 Attak
TT - I will
rxrider
Jan-Ove Pedersen
- Joined
- Apr 25, 2003
- Messages
- 7,356
- Age
- 59
- Location
- Lakselv - 70N & 25E
- Country
- Norway
- Snowmobile
- 2014 Phazer XTX, 2013 Phazer RTX, 2008 Apex RTX, 2007 Warrior, 2006 Attak
UPDATE - November 23. - Removing the ProAction, preparing for the ZX-2 install.
Garage hours started kinda late thursday night, so I didn't manage to get the ZX-2 mounting kit installed into the tunnel.
Work done thursday night:
I started out todays work removing the rear suspension, a step by step proceedure follows.
First I started removing the exhaust caps. Next step was removing the rear plastic cover.

Next I took off the nuts holding the seat in place, unhooked the rear light coupling underneat the covling on the right hand side of the tank, and removed the seat.

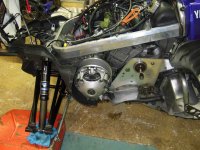
With the sled on the ground I removed all 6 bolts holding the skid in place, loosened the nut holding the rear axel in place and loosened the track tensioner all the way out. Next was removing the remaining 3 bolts holding the chaincase in place. Then I removed 4 nuts holding the speedo pickup, speedo sender and bearing cup. Next was removing the tork set screws holding the left side drive axel bearing to the drive axel and removing the bearing. With the left side done I removed the chain case from the frame. To remove the ProAction skid I lifted the rear end of the sled 3 ft off the ground.

With the rear end off the ground I removed the ProAction skid.

Then I removed the drive axel. This is what the WhalBros extroverts looks like after two seasons of abuse.


Finally I removed the track. Sled is prepared to have the ZX-2 mouning kit installed.

I will not miss the ProAction MPI 136 skid

changing it out with the AD Boivin ZX-2 136 EXtend
At last I did remove the parking brake. Weight savings so far has accumulated to 46 lbs or 21 kg.
I'm glad I did this job because both left side drive axel bearing and left side jack shaft bearing are shot and need replacement. I would not have discovered the worn out jackshaft bearing without removing both chain case and seconadary clutch. I already have the drive axel bearing, but I need to order the jackshaft bearing. While having the chaincase off the frame I checked the chaincase bearings, no need to change them out this year, but I will take a close look at them after this season.
Just ordered the jackshaft bearing from my local dealer Midt-Finnmark Motor. They offered me help on the replacement of the jackshaft bearing cause some special tools are needed to change out that bearing, nice guys and great service. He said that they have only replaced that bearing a few times. Beeing a turbo sled I can live with changeing that bearing every other year. I expect a shorter life span out of the bearings running a turbo.
Bearing replacement interval established, milage 2000 miles / 3200 kms a year:
- Drive axel bearing left side, replacement once a year.
- Jackshaft bearing left side, replacement every two years.
- Chaincase bearings, replacement every three years.
Garage hours started kinda late thursday night, so I didn't manage to get the ZX-2 mounting kit installed into the tunnel.
Work done thursday night:
I started out todays work removing the rear suspension, a step by step proceedure follows.
First I started removing the exhaust caps. Next step was removing the rear plastic cover.
Next I took off the nuts holding the seat in place, unhooked the rear light coupling underneat the covling on the right hand side of the tank, and removed the seat.
With the sled on the ground I removed all 6 bolts holding the skid in place, loosened the nut holding the rear axel in place and loosened the track tensioner all the way out. Next was removing the remaining 3 bolts holding the chaincase in place. Then I removed 4 nuts holding the speedo pickup, speedo sender and bearing cup. Next was removing the tork set screws holding the left side drive axel bearing to the drive axel and removing the bearing. With the left side done I removed the chain case from the frame. To remove the ProAction skid I lifted the rear end of the sled 3 ft off the ground.
With the rear end off the ground I removed the ProAction skid.
Then I removed the drive axel. This is what the WhalBros extroverts looks like after two seasons of abuse.
Finally I removed the track. Sled is prepared to have the ZX-2 mouning kit installed.
I will not miss the ProAction MPI 136 skid
changing it out with the AD Boivin ZX-2 136 EXtend
At last I did remove the parking brake. Weight savings so far has accumulated to 46 lbs or 21 kg.
I'm glad I did this job because both left side drive axel bearing and left side jack shaft bearing are shot and need replacement. I would not have discovered the worn out jackshaft bearing without removing both chain case and seconadary clutch. I already have the drive axel bearing, but I need to order the jackshaft bearing. While having the chaincase off the frame I checked the chaincase bearings, no need to change them out this year, but I will take a close look at them after this season.
Just ordered the jackshaft bearing from my local dealer Midt-Finnmark Motor. They offered me help on the replacement of the jackshaft bearing cause some special tools are needed to change out that bearing, nice guys and great service
. He said that they have only replaced that bearing a few times. Beeing a turbo sled I can live with changeing that bearing every other year. I expect a shorter life span out of the bearings running a turbo. Bearing replacement interval established, milage 2000 miles / 3200 kms a year:
- Drive axel bearing left side, replacement once a year.
- Jackshaft bearing left side, replacement every two years.
- Chaincase bearings, replacement every three years.
Similar threads
- Replies
- 46
- Views
- 146K
-
This site uses cookies to help personalise content, tailor your experience and to keep you logged in if you register.
By continuing to use this site, you are consenting to our use of cookies.