

blevis213
Lifetime Member
- Joined
- Apr 13, 2013
- Messages
- 387
- Location
- hadley, new york
- Country
- USA
- Snowmobile
- 2014 apex se
2001 srx 700
2000 srx 700
2021 sidewinder srx
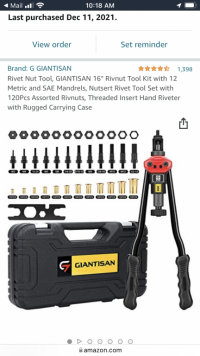
I'm getting ready to do this to my srx. I have everything ordered to do this like rockerdan did his. My question is for guys that have did this any extra tips that dan didn't post. What size drill bits was needed to make the hole bigger for the 1/4-20 and 10-24? I'm actually going to buy a piece of 1/16 aluminum to test on first before tearing the sled apart. Thanks in advance.
WinderFab
TY 4 Stroke God
- Joined
- Mar 1, 2009
- Messages
- 1,862
- Age
- 46
- Location
- Woodbridge, ON
- Country
- Canada
- Snowmobile
- 2020 Sidewinder Ltx GT
If you are referring to the rivnuts, 25/64” drill should be for 1/4” 20 and the 10-24” should be 19/64”. You want the holes to be nice a snug ;-)..
sab2022
Expert
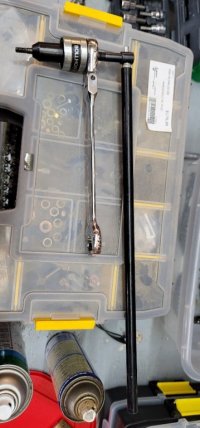
Its been awhile but I did both sides of the sled (sled sold). IMO you need to spend the money on the right tools (i.e. good nose pieces) because your using very hard SS hardware and you may have to change your rivet nut tool for a particular riv-nut. I bought both the large (#1442) and small (#443B) Astro Pneumatic rivet nut tools. (I don't think the small one was really necessary - don't remember). The rivet at the top of the shock was the toughest because there was no room for the tool. I ended-up using the Harbor Freight rivet nut tool but the Harbor Freight rivet nut nose piece snaps extremely easily w/ the SS hardware....don't squeeze to much.
Whatever rivet nut tool you used get an extra nose piece. Get the sled up in the air (lift) and get comfortable - no angled riv-nutting. I didn't mind spending the extra money on tools because I have other powersports. I've even riv-nutted plastic on my ATV.
Yes definity practice with the SS hardware . I practiced on aluminum molding. Remember, not to tight and you can always screw the the nose piece in and squeeze some more if you need too. Good luck
WinderFab
TY 4 Stroke God
- Joined
- Mar 1, 2009
- Messages
- 1,862
- Age
- 46
- Location
- Woodbridge, ON
- Country
- Canada
- Snowmobile
- 2020 Sidewinder Ltx GT
Also like sab2020 said the one behind the upper shock mount is the hardest to get at so I ended up using a M6 bolt, I drilled a 3/16” or 13/64” hole and used a M6 tap and it worked out perfectly.
I also had the first couple rivets spinning a bit while trying to drill them out, what helped with this was use a drill bit that’s the size of the rivets, 3/16” rivet use a 3/16” drill so it doesn’t catch to much of the flange.
Buy good quality drill bits and tools, take your time and you should be good to go.
blevis213
Lifetime Member
- Joined
- Apr 13, 2013
- Messages
- 387
- Location
- hadley, new york
- Country
- USA
- Snowmobile
- 2014 apex se
2001 srx 700
2000 srx 700
2021 sidewinder srx
WinderFab
TY 4 Stroke God
- Joined
- Mar 1, 2009
- Messages
- 1,862
- Age
- 46
- Location
- Woodbridge, ON
- Country
- Canada
- Snowmobile
- 2020 Sidewinder Ltx GT
Hopefully that works out for you, just remember that most of these are made for aluminum rivnuts, using Steel or SS rivnuts causes havoc of these rivet guns.
I gave up on using them and switched to the nut and bolt method. Of course this way your limited to access like the one above front shocks but works great on all other locations.
I gave up on using them and switched to the nut and bolt method. Of course this way your limited to access like the one above front shocks but works great on all other locations.
Kuzzy
Expert
- Joined
- Dec 6, 2020
- Messages
- 442
- Age
- 43
- Location
- saskatchewan
- Country
- Canada
- Snowmobile
- 2020 yamaha sidewinder xtx se
2022 STX GT
2017 King Cat M9000
KillerBee
VIP Member
- Joined
- Jan 1, 2010
- Messages
- 71
- Location
- Waukesha WI
- Country
- USA
- Snowmobile
- 2018 Sidewinder LTX LE 50th
When drilling the factory rivets go slow. They heat up quickly and if they start spinning you may start melting plastic. Don’t ask how i know. Ha
fourload
TY 4 Stroke Master
Barn of parts recommends drilling and using plastic pop rivets. He has them on his online store. Might be the easier way to go. My wife’s Poo Poo has loads of them and they hold up great.
Fords4life
Expert
- Joined
- Dec 7, 2021
- Messages
- 318
- Age
- 57
- Location
- South Dakota
- Country
- USA
- Snowmobile
- 2021 riot 9000 & 2017 sw rtx
Clamping a needle nose vice grip on back side of rivit works well for me on keeping rivits from spinning on drill outs. But of course there are some always you cant reach.
sab2022
Expert
There's been a couple of threads like this one in the past, and the following comment is always made, so I make it here ....Why does Yamaha make so tough to remove the panel to perform maintenance?
WinderFab
TY 4 Stroke God
- Joined
- Mar 1, 2009
- Messages
- 1,862
- Age
- 46
- Location
- Woodbridge, ON
- Country
- Canada
- Snowmobile
- 2020 Sidewinder Ltx GT
Because riveting the panels on is cheap and fast.There's been a couple of threads like this one in the past, and the following comment is always made, so I make it here ....Why does Yamaha make so tough to remove the panel to perform maintenance?
vodoo child
Expert
- Joined
- Oct 29, 2005
- Messages
- 464
- Location
- Palmerton Pa.
- Country
- USA
- Snowmobile
- 2018 Sidewinder LTX/LE 50th
I riv nutted both sides of mine as per Rocker Dan's post, along with the disc brake guard and the chain case guard. The factory inner rear rivet on the chain case guard was tight against the chain case and left a little wear mark!  I'm thinking of switching over to SS allen heads rather then the SS phillips head screws. Might be a tad easier to install, especially the bolt at the top of the shock! Definitely makes the seasonal maintenance a lot cleaner and easier!
 !")
I'm thinking of switching over to SS allen heads rather then the SS phillips head screws. Might be a tad easier to install, especially the bolt at the top of the shock! Definitely makes the seasonal maintenance a lot cleaner and easier! WinderFab
TY 4 Stroke God
- Joined
- Mar 1, 2009
- Messages
- 1,862
- Age
- 46
- Location
- Woodbridge, ON
- Country
- Canada
- Snowmobile
- 2020 Sidewinder Ltx GT
I used M6 SS hex bolts, Hex or Allen would be much easier than Phillips.I riv nutted both sides of mine as per Rocker Dan's post, along with the disc brake guard and the chain case guard. The factory inner rear rivet on the chain case guard was tight against the chain case and left a little wear mark!
02ViperMody44
Lifetime Member
- Joined
- Jan 26, 2009
- Messages
- 580
- Location
- Utica, NY
- Country
- USA
- Snowmobile
- 2020 Sidewinder SRX
2013 Yamaha XTX
- LOCATION
- Old Forge, NY
- YAHOO
- ramody44@yahoo.com
I ordered SS bolts that are a T-25 head, M5 bolt. Worked great, and I used the drilled out large rivet heads as washers.
Similar threads
- Replies
- 7
- Views
- 3K
-
This site uses cookies to help personalise content, tailor your experience and to keep you logged in if you register.
By continuing to use this site, you are consenting to our use of cookies.