Let me know when you want a full system !")
revster
TY 4 Stroke God
- Joined
- Aug 18, 2004
- Messages
- 1,752
- Location
- La Salle MB
- Country
- Canada
- Snowmobile
- 2009 Yamaha Nytro RTX SE
shaddow44 said:Let me know when you want a full system
Well right now the plan is for next season, but keep me informed on your testing this year for sure!!
revster
TY 4 Stroke God
- Joined
- Aug 18, 2004
- Messages
- 1,752
- Location
- La Salle MB
- Country
- Canada
- Snowmobile
- 2009 Yamaha Nytro RTX SE
I've made a decision on the track. The 2" challenger that I was going to use would be my best choice for our annual trip to the mountains. However around Manitoba the lugs are too big and bend too much resulting in a lot of spinning and that would suck the fun out of our annual 500 mile trail trip.
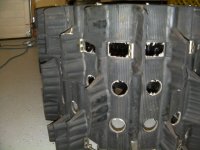
So I bough off a buddy a ski-doo Hillcross track. I believe it was 2005 that doo last made them with 136" and 2.52 pitch. So the track is 136" x 15" x 1.75" all windows open but light weight clipped every second. The track has 500 miles on it and the previous owner ported it. I'm not sure how I feel about this, I've never ported a track it seems to have positives and negatives.
So I bough off a buddy a ski-doo Hillcross track. I believe it was 2005 that doo last made them with 136" and 2.52 pitch. So the track is 136" x 15" x 1.75" all windows open but light weight clipped every second. The track has 500 miles on it and the previous owner ported it. I'm not sure how I feel about this, I've never ported a track it seems to have positives and negatives.
Attachments
revster
TY 4 Stroke God
- Joined
- Aug 18, 2004
- Messages
- 1,752
- Location
- La Salle MB
- Country
- Canada
- Snowmobile
- 2009 Yamaha Nytro RTX SE
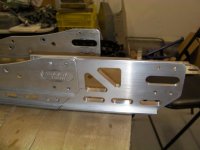
I've torn down the skid to prep for powder coating. Before I send the rails and extensions out I wanted to mock them up so that any grinding and hole drilling is done before they are powder coated.
I think I'm going to cut that corner off from the extension that sticks above the rail.
Rail extensions are made by TRACKS USA and were purchased as part of the extension kit from ULMER RACING.
....note: I later changed out the tracks USA extension for tipped up ones from OFT
I think I'm going to cut that corner off from the extension that sticks above the rail.
Rail extensions are made by TRACKS USA and were purchased as part of the extension kit from ULMER RACING.
....note: I later changed out the tracks USA extension for tipped up ones from OFT
Attachments


revster
TY 4 Stroke God
- Joined
- Aug 18, 2004
- Messages
- 1,752
- Location
- La Salle MB
- Country
- Canada
- Snowmobile
- 2009 Yamaha Nytro RTX SE
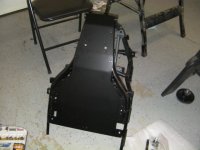
Because I had grizztracks support plates welded into my subframe. My Roest skid plate wouldn't mount up the way it is supposed to. What I mean is I am no longer able to access the top of the factory support plates to put nuts on the bolts.
However I found that the clips that came with the kit were perfect. I just had to grind the support plate down a c-hair so the clip would go on far enough and it works great.
So I'm done mocking up my subframe and it is ready to go back on the sled....
However I found that the clips that came with the kit were perfect. I just had to grind the support plate down a c-hair so the clip would go on far enough and it works great.
So I'm done mocking up my subframe and it is ready to go back on the sled....
Attachments

revster
TY 4 Stroke God
- Joined
- Aug 18, 2004
- Messages
- 1,752
- Location
- La Salle MB
- Country
- Canada
- Snowmobile
- 2009 Yamaha Nytro RTX SE
It's coming along nicely, the rails look great!
revster
TY 4 Stroke God
- Joined
- Aug 18, 2004
- Messages
- 1,752
- Location
- La Salle MB
- Country
- Canada
- Snowmobile
- 2009 Yamaha Nytro RTX SE
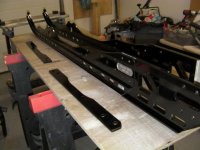
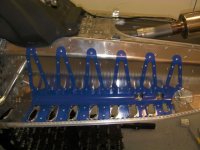
I now have the subframe painted, didn't spend much time on it just touched it up where the support plates were welded in.
,,,,and I added Yamaha competition tunnel braces. I'll likely add some rivets to the running board area but I ran out.
,,,,and I added Yamaha competition tunnel braces. I'll likely add some rivets to the running board area but I ran out.
Attachments

Bump to subscribe...
Lookin' great!
Lookin' great!
revster
TY 4 Stroke God
- Joined
- Aug 18, 2004
- Messages
- 1,752
- Location
- La Salle MB
- Country
- Canada
- Snowmobile
- 2009 Yamaha Nytro RTX SE
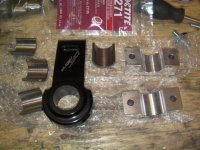
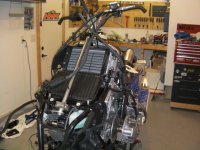
A buddy cam over and helped me mount the subframe on the sled again. ...and as a result I was able to get to something I was looking forward to.... installing the OFT post re-locator!
I cleaned up the post and pulled the wires out of the way to get ready. I also printed off the instructions from OFT's site. Great instructions; everything is explained with pics!
I cleaned up the post and pulled the wires out of the way to get ready. I also printed off the instructions from OFT's site. Great instructions; everything is explained with pics!
Attachments
revster
TY 4 Stroke God
- Joined
- Aug 18, 2004
- Messages
- 1,752
- Location
- La Salle MB
- Country
- Canada
- Snowmobile
- 2009 Yamaha Nytro RTX SE
When you drop the bottom post mount on you can see that it is angled. This creates a gap between the inner mount and the subframe mount plate. You simply use a 10mm deep socket to bent the bolts down till the bottom mount is flat against the subframe plate.
Attachments
revster
TY 4 Stroke God
- Joined
- Aug 18, 2004
- Messages
- 1,752
- Location
- La Salle MB
- Country
- Canada
- Snowmobile
- 2009 Yamaha Nytro RTX SE
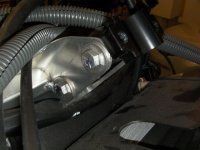
Then I put the top mount in place with the oilite bushings in place, and laid the post on top.
You can use the stock mount bracket (bolts) at the top and just trim the wire clip at the top, however I just put in a couple of new bolts that I had.
You can use the stock mount bracket (bolts) at the top and just trim the wire clip at the top, however I just put in a couple of new bolts that I had.
Attachments

revster
TY 4 Stroke God
- Joined
- Aug 18, 2004
- Messages
- 1,752
- Location
- La Salle MB
- Country
- Canada
- Snowmobile
- 2009 Yamaha Nytro RTX SE
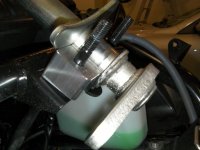
Then it was just a matter of putting the top oillite bushings in place and bolting down the top mounts.
This OFT re-locator is a high quality product, with easy to understand instructions (with pics) and great customer service from Jeff and Scott. A revster approved product!
This OFT re-locator is a high quality product, with easy to understand instructions (with pics) and great customer service from Jeff and Scott. A revster approved product!
Attachments
revster
TY 4 Stroke God
- Joined
- Aug 18, 2004
- Messages
- 1,752
- Location
- La Salle MB
- Country
- Canada
- Snowmobile
- 2009 Yamaha Nytro RTX SE
Similar threads
- Replies
- 4
- Views
- 4K
- Replies
- 0
- Views
- 712
- Replies
- 9
- Views
- 2K
-
This site uses cookies to help personalise content, tailor your experience and to keep you logged in if you register.
By continuing to use this site, you are consenting to our use of cookies.