Matsofatso
Newbie
For anyone who owns a 2007 or newer yamaha phazer and has a turbo kit installed on it and wants to know more about what to do in the case of a burnt down motor!
So to begin my story. I purchased my phazer from a guy who bought it brand new and had the turbo installed at 0000 miles. Machine was a blast on the bottom end! picked the skis up every where i went.
However, at full throttle and about 40 mph or 65 kmh (odd as it was) it would fall FLAT on its face and bog. No codes were being thrown and the machine was not running hot. However, oil was being misted everywhere and white smoke was coming from the exhaust. My first thought to this was Blown head gasket and bad rings on the pistons! So as happy as I was with how good it ran on a blown motor and having my boss roll it down a hill, SIGH, it was time for me to begin the fun of tearing it down and re-building it.
First mistake the original owner made: the dealer installed the turbo kit and from what it looks they used the supplied head shim, however, they did not retard the cams as required if the head shim is used!!! Sure enough, I ran a compression and leak down test and both cans were SHOT! 85 psi in one chamber and 100-105 in the other. Should be hitting 120 psi in both chambers!
Second mistake the owner made: Later down the road the original owner decided to swap the head shim for THREE stacked stock head gaskets, not sure how this worked out, but it seems retarded in my opinion. One head gasket and stock timing on the cams should be fine as long as the machine stays above 1333 meters or 4000 feet.
Third mistake the owner made: He soon decided that he need to gain more power out of the minuscule pz50w engine and eliminated the PCV (pressure control valve) from the MCX wiring harness and installed a manual boost controller from Joe PMB. FACE PALM! MCX spent hours designing the phazer turbo kit and im positive they would recommend that the owners run their kits with the PCV! Reason being (Im assuming), the supplied EFI box that comes with the MCX kit would like to know how much psi is being produced to be able to compensate for how much fuel to deliver to the motor as well as to know when to open or close the waste gate! In this case the controller is designed to open and close the waste-gate at 12 psi! Let me repeat this, TWELVE PSI, if the phazer could handle more boost and be fine then I am most positive that MCX would have designed two kits for different boost setups or allowed one kit to be adjusted.
MY MISSION:
New Top End: pistons/rings/wrist pins/clips. Tools needed for install: carb cleaner/air hose/oil/ring compressor/torque wrench. In this order for install to keep things clean and smooth.
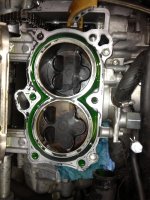
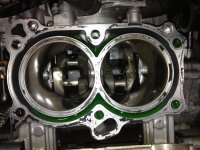
Hone the Cylinders: Since the Rings were shot, they clearly ran grooves in the cylinder wall. bought a nice little non expensive kit with stones from auto zone and shaved a couple thousands off to have smooth cylinders for the new pistons and rings. This will also ensure a tight fit with no oil sneaking past the rings into the combustion chamber.
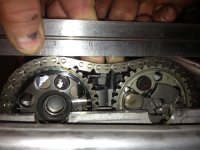
Re-build the valve train: valves appear to be severely burnt. I will use a valve compressor/seafoam/carb cleaner/dremel with soft wire brush/and low grit sand paper to clean the valves for a SOLID seat on the head. BE SURE TO TAKE PICTURES OF WHERE THE CAMS AND CAM CHAIN ARE AS WELL AS THE POSITION OF THE SHIMS AND SPACERS PRIOR TO DISASSEMBLY!!!
When re-installing everything you need to know torque specs, here they are: http://www.pdf-archive.com/2011/08/03/2 ... manual.pdf READ!!!
Re-build the throttle body: The stock clamps that connect from the throttle body to the block have spacers that do not allow them to clamp firmly down on the connecting tubes. I will remove the spacer for a solid clamp. Reason being, I discovered a boost leak at this point. Reason being, when you are creating that much psi in the intake, the pressure does have the capability to separate and expand boost tubes and intake tubes. I.E. loss of boost and perhaps microns of fuel = loss of power.
Clean the intercooler (plenum): due to unknown torn boost tubes water and oil has entered into the intercooler, therefore i shall clean it and make sure the supplied MCX injectors are clean and functional. ALSO, make sure the intercooler has a SOLID connection between it and the throttle body. Noticed lots of weak points here where boost was leaking!!!
Replace top and bottom end gaskets: in order to replace the top end the oil pan must be removed to access the rods bolts therefore we need new top and bottom end gaskets to ensure TIGHT and SEALED connections.
Re-Install the PCV onto the wiring harness for the EFI: The PCV that came with the kit was not available to me so I took on the mission of discovering what PCV MCX used on their kits and it just so happened to be the PCV for a VOLVO S40/S70/V70 turbo. Here's the link for an example for anyone who might need one: http://www.ebay.com/itm/140747069247?ss ... 1439.l2649
YES, they can be found on ebay.
Buy a FEMALE connector for the PCV: Seeing how the PCV was missing from the turbo, so was the connector. I need this connector so as to have a plug going to the EFI controller. I could probably rig something to go without but I like things to be clean. So I went to a local car quest and matched a connector as good as I could to the PCV. I will let everyone know If the connector i got will work.
Install new Boost Tubing: Many of the already existing boost tubes had HOLES and TEARS!! AHHHHH! Loss of boost = loss of power, SHAKING MY HEAD! What on earth was the original owner of this thing thinking???????
Re-build the turbo: simply break down the turbo and check the cartridge for bad bearings. Everything checked out so i already have it rebuilt and solid on its connections so there shall be NO leaks and even polished the housing and connecting clamp to pretty it up some!
Re-build the exhaust manifold: the connection from the exhaust to the turbo housing was bad. Again, another point i came across where the turbo is losing power simply due to bad connections. cleaned all the surfaces with a bench mounted wire brush/grinder, and buffed the surfaces for clean connections. Also, used high temp silicon between all exhaust connections to ensure no exhaust leaks!
New Handlebars: Seeing how my boss rolled my new to me turbo phazer, I needed some new bars. Went ahead and bought some red renthal fat bars and polished and modified the riser and clamp to accept the new bars!
Oil filter and Oil: Since you will obviously have to break down the motor you have to change the oil. pm me if you want to know what I used bc i dont remember at the current moment.
FINALLY: Re-install everything and check it for leaks/ensure the turbo is receiving oil/engine does not overheat after idling and listen for any irregularities.
The setup I plan on running is: STOCK HEAD GASKET (BC im above 9000ft or 3000m when riding) / STOCK TIMING / 10 PSI (BC im running stock gasket and timing) / AND VP 110 RACE GAS
CANT WAIT!!!!!!!!! If this crazy thing ran as good as it did with a blown motor, i cant wait to ride it with everything being brand new fresh!!!!
So to begin my story. I purchased my phazer from a guy who bought it brand new and had the turbo installed at 0000 miles. Machine was a blast on the bottom end! picked the skis up every where i went.
However, at full throttle and about 40 mph or 65 kmh (odd as it was) it would fall FLAT on its face and bog. No codes were being thrown and the machine was not running hot. However, oil was being misted everywhere and white smoke was coming from the exhaust. My first thought to this was Blown head gasket and bad rings on the pistons! So as happy as I was with how good it ran on a blown motor and having my boss roll it down a hill, SIGH, it was time for me to begin the fun of tearing it down and re-building it.
First mistake the original owner made: the dealer installed the turbo kit and from what it looks they used the supplied head shim, however, they did not retard the cams as required if the head shim is used!!! Sure enough, I ran a compression and leak down test and both cans were SHOT! 85 psi in one chamber and 100-105 in the other. Should be hitting 120 psi in both chambers!
Second mistake the owner made: Later down the road the original owner decided to swap the head shim for THREE stacked stock head gaskets, not sure how this worked out, but it seems retarded in my opinion. One head gasket and stock timing on the cams should be fine as long as the machine stays above 1333 meters or 4000 feet.
Third mistake the owner made: He soon decided that he need to gain more power out of the minuscule pz50w engine and eliminated the PCV (pressure control valve) from the MCX wiring harness and installed a manual boost controller from Joe PMB. FACE PALM! MCX spent hours designing the phazer turbo kit and im positive they would recommend that the owners run their kits with the PCV! Reason being (Im assuming), the supplied EFI box that comes with the MCX kit would like to know how much psi is being produced to be able to compensate for how much fuel to deliver to the motor as well as to know when to open or close the waste gate! In this case the controller is designed to open and close the waste-gate at 12 psi! Let me repeat this, TWELVE PSI, if the phazer could handle more boost and be fine then I am most positive that MCX would have designed two kits for different boost setups or allowed one kit to be adjusted.
MY MISSION:
New Top End: pistons/rings/wrist pins/clips. Tools needed for install: carb cleaner/air hose/oil/ring compressor/torque wrench. In this order for install to keep things clean and smooth.
Hone the Cylinders: Since the Rings were shot, they clearly ran grooves in the cylinder wall. bought a nice little non expensive kit with stones from auto zone and shaved a couple thousands off to have smooth cylinders for the new pistons and rings. This will also ensure a tight fit with no oil sneaking past the rings into the combustion chamber.
Re-build the valve train: valves appear to be severely burnt. I will use a valve compressor/seafoam/carb cleaner/dremel with soft wire brush/and low grit sand paper to clean the valves for a SOLID seat on the head. BE SURE TO TAKE PICTURES OF WHERE THE CAMS AND CAM CHAIN ARE AS WELL AS THE POSITION OF THE SHIMS AND SPACERS PRIOR TO DISASSEMBLY!!!
When re-installing everything you need to know torque specs, here they are: http://www.pdf-archive.com/2011/08/03/2 ... manual.pdf READ!!!
Re-build the throttle body: The stock clamps that connect from the throttle body to the block have spacers that do not allow them to clamp firmly down on the connecting tubes. I will remove the spacer for a solid clamp. Reason being, I discovered a boost leak at this point. Reason being, when you are creating that much psi in the intake, the pressure does have the capability to separate and expand boost tubes and intake tubes. I.E. loss of boost and perhaps microns of fuel = loss of power.
Clean the intercooler (plenum): due to unknown torn boost tubes water and oil has entered into the intercooler, therefore i shall clean it and make sure the supplied MCX injectors are clean and functional. ALSO, make sure the intercooler has a SOLID connection between it and the throttle body. Noticed lots of weak points here where boost was leaking!!!
Replace top and bottom end gaskets: in order to replace the top end the oil pan must be removed to access the rods bolts therefore we need new top and bottom end gaskets to ensure TIGHT and SEALED connections.
Re-Install the PCV onto the wiring harness for the EFI: The PCV that came with the kit was not available to me so I took on the mission of discovering what PCV MCX used on their kits and it just so happened to be the PCV for a VOLVO S40/S70/V70 turbo. Here's the link for an example for anyone who might need one: http://www.ebay.com/itm/140747069247?ss ... 1439.l2649
YES, they can be found on ebay.
Buy a FEMALE connector for the PCV: Seeing how the PCV was missing from the turbo, so was the connector. I need this connector so as to have a plug going to the EFI controller. I could probably rig something to go without but I like things to be clean. So I went to a local car quest and matched a connector as good as I could to the PCV. I will let everyone know If the connector i got will work.
Install new Boost Tubing: Many of the already existing boost tubes had HOLES and TEARS!! AHHHHH! Loss of boost = loss of power, SHAKING MY HEAD! What on earth was the original owner of this thing thinking???????
Re-build the turbo: simply break down the turbo and check the cartridge for bad bearings. Everything checked out so i already have it rebuilt and solid on its connections so there shall be NO leaks and even polished the housing and connecting clamp to pretty it up some!
Re-build the exhaust manifold: the connection from the exhaust to the turbo housing was bad. Again, another point i came across where the turbo is losing power simply due to bad connections. cleaned all the surfaces with a bench mounted wire brush/grinder, and buffed the surfaces for clean connections. Also, used high temp silicon between all exhaust connections to ensure no exhaust leaks!
New Handlebars: Seeing how my boss rolled my new to me turbo phazer, I needed some new bars. Went ahead and bought some red renthal fat bars and polished and modified the riser and clamp to accept the new bars!
Oil filter and Oil: Since you will obviously have to break down the motor you have to change the oil. pm me if you want to know what I used bc i dont remember at the current moment.
FINALLY: Re-install everything and check it for leaks/ensure the turbo is receiving oil/engine does not overheat after idling and listen for any irregularities.
The setup I plan on running is: STOCK HEAD GASKET (BC im above 9000ft or 3000m when riding) / STOCK TIMING / 10 PSI (BC im running stock gasket and timing) / AND VP 110 RACE GAS
CANT WAIT!!!!!!!!! If this crazy thing ran as good as it did with a blown motor, i cant wait to ride it with everything being brand new fresh!!!!
Matsofatso
Newbie
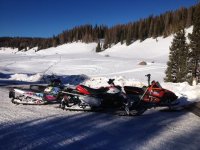
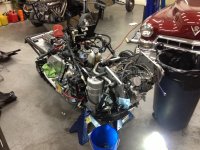
Here are some photos of the machine and whats been going down.
Attachments
-
 get-attachment-5.aspx.jpeg271.4 KB · Views: 496
 -
 get-attachment-6.aspx.jpeg266.6 KB · Views: 682
 -
 get-attachment-4.aspx.jpeg318.7 KB · Views: 546
 -
 get-attachment-8.aspx.jpeg718.8 KB · Views: 471
 -
 get-attachment-7.aspx.jpeg273.1 KB · Views: 460
 -
 get-attachment-2.aspx.jpeg728.8 KB · Views: 556
 -
 get-attachment.aspx.jpeg625.7 KB · Views: 494
 -
 get-attachment-1.aspx copy.jpeg337.4 KB · Views: 524
 -
 get-attachment-3.aspx.jpeg707.4 KB · Views: 526
 -
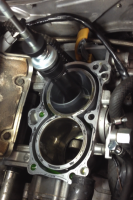 photo_5.PNG692.4 KB · Views: 449
Matsofatso
Newbie
ANYBODY, feel free to shoot me a pm if you have a question about something. I will do my best to answer you as thorough as possible. these little 4 strokes are tricky machines, but very rewarding if set up and treated properly.


This is a awesome thread!You were able to remove head with motor still in?Was the hone you used a diamond hone?How can you be sure you didnt go through Nikasil coating if so?I have a ported head I havebt had the nads to install yet.Daunting task but I need to do it for next level.Any recommendation for AFR meter?Can I put this in FAQ section so its permanent?
Matsofatso
Newbie
cannondale27 said:This is a awesome thread!You were able to remove head with motor still in?Was the hone you used a diamond hone?How can you be sure you didnt go through Nikasil coating if so?I have a ported head I havebt had the nads to install yet.Daunting task but I need to do it for next level.Any recommendation for AFR meter?Can I put this in FAQ section so its permanent?
Thats fine with me! Just wanted a solid thread to be built and have people come lay down more advice and input, bc im still figuring a lot of stuff out as i go down the road.
To answer your questions:
Yes, i revomved all the wiring out of the way and tilted the top half of the frame backwards and the front subframe off to get it out of the way(requires removing 14 bolts to do this). From there it is very easy to access everything on the motor and the bulkhead acts as a nice stand for the engine.
The hone i used does use diamonds. But im sure a soft stone hone will do fine. You only want to take off very little from the cylinder walls! Just enough to cover old scarring and have new angled cross hatching along the walls.
As far as whether i know i didnt hit the nikasil coating? This is a step that goes beyond me and most garage monkeys that do their own work. The best i could do for this was use my feeler gauge to see what the cylinders diamters were before and after the hone. As far as im concerned, i did not affect it as i barely even touched the walls. This also brings to mind another recommendation! Be sure, that if you are attempting to hone the cylinders, you penetrate the cylinder walls as you would your wives! Controlled speed and an in and out fashion! Going too fast and out of control can damage the cylinder walls!
This is indeed a daunting task, but if performed amd completed properly, its a hole new set of skills you learned and prepares you for the next time it must be done! And even if things go wrong, it gives you a reason to get in the shop and have some more fun tearing things down with buddies and trying different options!
Matsofatso
Newbie
Oh yeah, and a good AFR gauge that I'm using is the dm-6 combo from PLX devices.
Link: http://www.plxdevices.com/product_info. ... DSMAFR_DM6
Uses a good oxygen sensor from Bosch and has a touch screen gauge. Pretty sleek IMO.
Link: http://www.plxdevices.com/product_info. ... DSMAFR_DM6
Uses a good oxygen sensor from Bosch and has a touch screen gauge. Pretty sleek IMO.
Nice!Thanks.
greenthumb
Pro
What was the mileage?
Did you check out / do any work to the bottom end? Bearing clearances, out of round, etc.
Did you check out / do any work to the bottom end? Bearing clearances, out of round, etc.
Matsofatso
Newbie
Mileage was right at 2000 miles (3219km).
This motor should be able to go longer than that even with a turbo installed.
Bearings on the rods look good, i buffed them a little to mellow out some tiny grooves.
Crank looks good and doesnt appear to out of round/balance according to some measurements i took. I'll try to get some pics of the bottom end for you so you can see whats going on after being blown with a turbo installed.
Other than that i was very surprised to how well the bottom end looked. Like you i was expecting a lot worse. Just makes me more confident in the fact that yamaha is using better than average components for their motors.
Are you going to use new rod and headbolts for final assembly?
Matsofatso
Newbie
cannondale27 said:Are you going to use new rod and headbolts for final assembly?
No sir, taking a risk, same rods and head bolts. Not that i am asking for a broke down machine, but i do want to know the life of oem parts on this motor. I was half tempted to use the original pistons because they really werent in that bad of shape! It was the rings/gaskets/ and valves that were beat. So i ordered to a new top end (pistons,rings,gaskets) and used a simple lapping tool and some valve grinding compound to clean the seats on the valves to ensure the compression is tight!
The biggest point of all of this is at the end of re assembly, i am going to post whats parts i ordered and how much it cost me. This way, it wont scare anyone to do it themselves and save some money.
So far my magic number for parts is only 200 bucks! Rebuilding any motor for 200 bucks makes me excited! Just requires a few man hours of labor which to me is all the fun.
MOUNTAIN VMAX4
Pro
Bullet proof
Funny about Yamaha using above average materials in their construction is that my Phazer threw a rod at 2500 miles with regular oil changes and maintenance, and I bought a whole new used sled that was a short track with all the good shocks and everything when I got it I figured out it had coolant in the oil. I bought it an 1300 miles and am not sure how long it had coolant in the oil I immediately tore down cleaned out the bottom end of milky oil had the head off thinking head gasket ended up being the water pump seal. fixed that and tried to flush out as much milky oil out of the system as possible. Changed the oil and got everything back together it threw a rod at about 1700 miles. Maybe its my luck but my buddy had one throw a rod too but his had a lot more miles. They are not a bullet proof motor even in stock form so be careful. Try not to over rev them and if you ever have to tear down check your rod and mains I did not and in retrospect the coolant could have damaged them and that could have been what caused them to go out.
Funny about Yamaha using above average materials in their construction is that my Phazer threw a rod at 2500 miles with regular oil changes and maintenance, and I bought a whole new used sled that was a short track with all the good shocks and everything when I got it I figured out it had coolant in the oil. I bought it an 1300 miles and am not sure how long it had coolant in the oil I immediately tore down cleaned out the bottom end of milky oil had the head off thinking head gasket ended up being the water pump seal. fixed that and tried to flush out as much milky oil out of the system as possible. Changed the oil and got everything back together it threw a rod at about 1700 miles. Maybe its my luck but my buddy had one throw a rod too but his had a lot more miles. They are not a bullet proof motor even in stock form so be careful. Try not to over rev them and if you ever have to tear down check your rod and mains I did not and in retrospect the coolant could have damaged them and that could have been what caused them to go out.
Matsofatso
Newbie
Re: Bullet proof
Well, rods and bearings appear to be in very good shape upon removal. And when I drained the oil in the beginning, it was very black and dark. No signs of water being in the oil, just signs of being burnt to due bad rings and head gasket. Probably will end up changing the oil after one solid ride due to remnants of crap being in there from the build. And ya, you never know, coulda just had some bad luck and owned a lemon! It's happened to me before!
MOUNTAIN VMAX4 said:Funny about Yamaha using above average materials in their construction is that my Phazer threw a rod at 2500 miles with regular oil changes and maintenance, and I bought a whole new used sled that was a short track with all the good shocks and everything when I got it I figured out it had coolant in the oil. I bought it an 1300 miles and am not sure how long it had coolant in the oil I immediately tore down cleaned out the bottom end of milky oil had the head off thinking head gasket ended up being the water pump seal. fixed that and tried to flush out as much milky oil out of the system as possible. Changed the oil and got everything back together it threw a rod at about 1700 miles. Maybe its my luck but my buddy had one throw a rod too but his had a lot more miles. They are not a bullet proof motor even in stock form so be careful. Try not to over rev them and if you ever have to tear down check your rod and mains I did not and in retrospect the coolant could have damaged them and that could have been what caused them to go out.
Well, rods and bearings appear to be in very good shape upon removal. And when I drained the oil in the beginning, it was very black and dark. No signs of water being in the oil, just signs of being burnt to due bad rings and head gasket. Probably will end up changing the oil after one solid ride due to remnants of crap being in there from the build. And ya, you never know, coulda just had some bad luck and owned a lemon! It's happened to me before!
Matsofatso
Newbie
I say that Yamaha uses quality parts, because I owned a YZ450F and a YFZ450 and I rode the living piss out of those things and I could never get them to break! Of course I always properly maintain them as well.
MOUNTAIN VMAX4
Pro
07 worst year anyway
All mine were 07s and maybe that is the problem that is the year with the gear reduction failures and such I just made the post to make sure you and everyone that has there motor apart check your rod and main bearings I should have, I believe that the coolant probably cause damage before I bought it, Just letting people learn from my mistakes. The first motor was definitely not coolant that caused it and I changed oil regularly. Good thread and some good stuff to learn from your thread. Definitely not trying to bash or anything!!! Good luck!! The Phazer is a very fun sled to ride I enjoyed it when it was running and my wife is very bummed about it. It was her pride and joy.
All mine were 07s and maybe that is the problem that is the year with the gear reduction failures and such I just made the post to make sure you and everyone that has there motor apart check your rod and main bearings I should have, I believe that the coolant probably cause damage before I bought it, Just letting people learn from my mistakes. The first motor was definitely not coolant that caused it and I changed oil regularly. Good thread and some good stuff to learn from your thread. Definitely not trying to bash or anything!!! Good luck!! The Phazer is a very fun sled to ride I enjoyed it when it was running and my wife is very bummed about it. It was her pride and joy.
Similar threads
- Replies
- 0
- Views
- 698
- Replies
- 26
- Views
- 3K
-
This site uses cookies to help personalise content, tailor your experience and to keep you logged in if you register.
By continuing to use this site, you are consenting to our use of cookies.