

nydiver
Lifetime Member
- Joined
- Apr 30, 2015
- Messages
- 373
- Location
- Syracuse, NY
- Country
- USA
- Snowmobile
- 09 Nytro XTX
09 Nytro RTX
91 Phazer II (gotta have a classic / kids bomber :) )
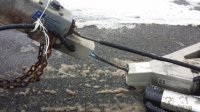
So I just got a post season deal of a 09 xtx for a song since someone didn't tell his wife he was snowchecking a new sled next year (I also didn't tell mine I was buying this sled so everyone is in the dog house). I picked it up on a very sketchy 8' utility flat bed and it was looking awfully upset that it had to ride on that POS for 3 hours to home. I saw this 10' aluminum dual on craigslist for 75, guy out right admitted it needed some work and the frame rail might be bent. I think the picture speaks for itself. I gave him 50 and slowly drove it home. When we turned it over the axle stayed right on the ground, so that made for an easy removal.
So here is the current progress:
1. MEASURE: Measure how far the old rails are from the edge of the trailer, measure how far from the cross member the axle was mounted back on the rail. For my trailer the rails were 20" from the outside edge, and the axle was 8" back from the closest crossmember (you'll see this later again)
2. Cut all the frame rails right next to the cross members with a sawzall or a porta-band. Let the saw do the work, if you put pressure on the blade it tends to load up with aluminum and then you might as well try and use a dull knife. The rails were welded on before the deck so on every cross member it is welded to where you can see the welds, and under the rails where you can't see nor reach easily with an angle grinder. SAVE THE PIECES!!! You'll use them later for reinforcement after you cut off any sketchy crap.
![IMG_0083[1].JPG](https://ty4stroke.com/data/attachments/66/66132-efb4461c50adcf9670261388783918ea.jpg "IMG_0083[1].JPG")
![IMG_0091[2].JPG](https://ty4stroke.com/data/attachments/66/66134-73047ea12f90fea927c5f03bbd8b5fff.jpg "IMG_0091[2].JPG")
![IMG_0089[1].JPG](https://ty4stroke.com/data/attachments/66/66142-ba323d6ef3bef07acf26087d0153f967.jpg "IMG_0089[1].JPG")
So here is the current progress:
1. MEASURE: Measure how far the old rails are from the edge of the trailer, measure how far from the cross member the axle was mounted back on the rail. For my trailer the rails were 20" from the outside edge, and the axle was 8" back from the closest crossmember (you'll see this later again)
2. Cut all the frame rails right next to the cross members with a sawzall or a porta-band. Let the saw do the work, if you put pressure on the blade it tends to load up with aluminum and then you might as well try and use a dull knife. The rails were welded on before the deck so on every cross member it is welded to where you can see the welds, and under the rails where you can't see nor reach easily with an angle grinder. SAVE THE PIECES!!! You'll use them later for reinforcement after you cut off any sketchy crap.
Last edited:
nydiver
Lifetime Member
- Joined
- Apr 30, 2015
- Messages
- 373
- Location
- Syracuse, NY
- Country
- USA
- Snowmobile
- 09 Nytro XTX
09 Nytro RTX
91 Phazer II (gotta have a classic / kids bomber :) )
2. Now you can grind off the welds that were under the rails before. I bought expensive aluminum .045 wheels, Harbor Freight wheels are cheaper and worked as well but they wore much faster, economically the faster wearing HF discs were cheaper in the end. Once you think you'd grinded the weld out but not cut into the crossmember, hit the chunk with a hammer and knock it off.
3. Next you need to clean up the crossmember. The idea is to remove all signs that the rail was ever there. I used an angle grinder with a dewalt depressed center wheel, it was like $3 and it worked awesome, steel or ferrous grinding wheels tend to load up and become useless fast, you need to buy a proper aluminum grinding wheel here. DO NOT USE A WIRE BRUSH EVER!!! Some wire brushes are not real Stainless and it will embed steel in the aluminum, later that is exactly where it corrodes out again. Sorry I didn't get pics for a while, but basically when you stand back it should look like a trailer ready for the new rails to be installed.
4. Get your new rails. I measured from the front of my lead crossmember to the back crossmember (61"), some people will go from header rail to the tail rail, basically spanning the entire trailer (10'). That would be extra strong, but I was cheap and basically it would of doubled my aluminum bill. I bought from Industrial Metals (2) 2"x4"x60" .25 wall rectangular tubes to replace my old 2"x3.5"x61" .125 wall tubes. I ended up at around 120 after shipping, prices vary daily and locally I couldn't touch that price. Scuff your new rails where you will be welding them with a stainless scratch brush (That's what a small wire brush is called, you need STAINLESS) I also wipe the area afterwards with lacquer thiner to ensure everything is clean and no aluminum oxidation is remaining
5. Start Welding. Stick I've never been a master at, I heard its do able, and some say its not hard at all to stick weld aluminum. Me? I'm a mig'er, I figure if I can teach my 5 yr old to weld in under an hour, then that's the method for me. BUT, it does require a special attachment: Spool Gun. For this I used my Hobart 210, a generic Miller 3035 spool gun ($275 gun that looks an AWFUL lot like the miller without the miller name printed on it for $200 more), and 5356 .030 wire. Read your welders manual, it should tell you how to set the welder, I didn't and was cussing for a while, then I looked at the machines cover setting chart and cranked up the setting 3 notches and doubled my wire feed and Boom, I was in like flynn. MOVE FAST, too much heat and your weld looks like poop and you stand a very good chance of blowing holes. In aluminum mig your spray welding, meaning the shielding gas actually blows the molten metal into the weld, its similar to steel, but alot brighter flash and not as forgiving on the lag time on the weld, move it move it move it, and push the puddle, don't drag.
Last edited:
nydiver
Lifetime Member
- Joined
- Apr 30, 2015
- Messages
- 373
- Location
- Syracuse, NY
- Country
- USA
- Snowmobile
- 09 Nytro XTX
09 Nytro RTX
91 Phazer II (gotta have a classic / kids bomber :) )
6. Go back to your measurements so you know where to place your rails, tack them in place and measure again, then maybe double check again. You really don't want to have to grind them out again. Tack them firmly then weld alternately, weld one side in the front, then the other side in the back, then on the middle member. You want to try and let the metals cool a little before you weld the other side. Do not weld on the faces, we're going to be putting gussets on the front and back to close the tubes in and add strength to the structure.
7. So now the rail is welded to the cross members, you want to take the original tubes you saved and examine them. Cut off the sketchy corroded material and hopefully you have enough to stand upright at the front and back rails to make gussets out of the old tube. See my pic, you can see at the front and the back that I added these. Also note mine when it broke bent the rear crossmember and weakened it. So I used some of the tube to sister in in front of the existing crossmember. I hope this proves to fix this up permanently. In any case, put the old tube standing up against the crossmember and rail combo and mark off the height of tube you need, cut them down and weld them in place.


7. So now the rail is welded to the cross members, you want to take the original tubes you saved and examine them. Cut off the sketchy corroded material and hopefully you have enough to stand upright at the front and back rails to make gussets out of the old tube. See my pic, you can see at the front and the back that I added these. Also note mine when it broke bent the rear crossmember and weakened it. So I used some of the tube to sister in in front of the existing crossmember. I hope this proves to fix this up permanently. In any case, put the old tube standing up against the crossmember and rail combo and mark off the height of tube you need, cut them down and weld them in place.
Last edited:
nydiver
Lifetime Member
- Joined
- Apr 30, 2015
- Messages
- 373
- Location
- Syracuse, NY
- Country
- USA
- Snowmobile
- 09 Nytro XTX
09 Nytro RTX
91 Phazer II (gotta have a classic / kids bomber :) )
8. So the rails are now in and are well supported. This brings us back to why I needed to fix this to begin with. The real issue is: Aluminum vs Steel. See the axle was painted steel that was then fastened to the aluminum rail using steel U-bolts. From a metallurgical standpoint that was bad, VERY BAD. See Aluminum and steel are not galvanic partners, they hate each other, so the steel oxide mixed in with the salt fog from the road salt led to a total failure of the aluminum rail. So how do we prevent this? Well it occurs because of electron flow, so we have to break up the electrical connection between the rail and the axle. I routed around in junk I had and found a roll of this sticker material and some butyl tape. The sticker is hard to see but its there and it over hangs 2" past where the axle will be mounted back to, I used 13 1/2" of length of the sticker so it would overlap an 1" or so when I wrapped it totally around the rail (2" wide + 4" tall + 2" + 4" is 12" all the way around, then add an 1" for overlap, then 1/2" for good measure and any loss in corners). I then stuck the butyl tape across the top and bottom of the rail for even more protection.


So this is where I'm at currently. My next step is to grind & wire wheel my axle in prep for the KBS system to be applied.
So this is where I'm at currently. My next step is to grind & wire wheel my axle in prep for the KBS system to be applied.
Last edited:
superfan75
TY 4 Stroke Junkie
Nice work ! I just got a Lincoln 140 mig welder myself. I've had an arc welder for years, but I wanted the mig for welding thinner metal. I'm going to try to patch my mower deck tomorrow with it after some practice. Someday in the future I'd like to get the spool gun for it so I can weld aluminum to.
nydiver
Lifetime Member
- Joined
- Apr 30, 2015
- Messages
- 373
- Location
- Syracuse, NY
- Country
- USA
- Snowmobile
- 09 Nytro XTX
09 Nytro RTX
91 Phazer II (gotta have a classic / kids bomber :) )
Nice work ! I just got a Lincoln 140 mig welder myself. I've had an arc welder for years, but I wanted the mig for welding thinner metal. I'm going to try to patch my mower deck tomorrow with it after some practice. Someday in the future I'd like to get the spool gun for it so I can weld aluminum to.
Nice unit there, handy since any 110 outlet and your in. Mine at 220V 30A single can be a hassle sometimes. Its basically tethered right to its outlet (40 ft lead lets it roll around everywhere and go outside), but there's something to be said for 1/2" steel in a single pass with ease. I have an old 110v Century I bust out for mobile jobs, I can power it off my truck with an inverter and using flux core.
Watch some youtube videos, and then give'r a rip on some scrap, push the puddle and make small swirls and soon you'll be a pro. I imagine you already have some .024 flux core for the mower deck. If you don't already have some, get some anti-spatter gel for the tip and paint the interior of the nozzle with it. Once slag and crap build up in the nozzle and hit the tip, well you aren't welding squat, and it can melt the wire in the tip, so have some extra tips too. Clean the nozzle out frequently and never have to worry about it. Cleanliness is godliness, so become a mig god and clean your surfaces to clean metal so you get excellent penetration and clean welds without impurities.
Still moving along, Thursday was washing the axle and wheels with the Rust Kleen, rinse and dry overnight. Friday was the Rust Blast party of keeping everything wet with the Blast (phosphoric acid) for 60 minutes, rinse and let dry overnight. Saturday saw the Rust Seal application to the wheels and axle. Sunday will see the homestretch of top coating with the Blacktop paint. At this point I just want to put my axle back on!!! I will start a separate thread for the KBS system application and things I found out as I went along with it, like namely how to save $$$ by not buying all the parts of the system.
Scooter02
Lifetime Member
- Joined
- Nov 26, 2007
- Messages
- 115
- Age
- 48
- Location
- Oak Creek, WI
- Country
- USA
- Snowmobile
- Yamaha Viper LTX LE
Nice write up, I have done some work on my trailer too because of the steel to aluminum corrosion at the axle location. Remember to isolate the bolts, if you are using steel bolts, when reattaching the axle to the trailer frame. I used some plastic washers that have collars in the holes of the trailer frame with steel washers on the nyloc nut side, to try to eliminate any steel to aluminum contact.
CaptCaper
VIP Member
- Joined
- Jan 1, 2007
- Messages
- 2,181
- Location
- Northern N.H.
- Country
- USA
- Snowmobile
- 2016 RS Vector XTX 1.25 Lug wifes..2013 RS Vector LTX.. 2003 600 VMax Past Machines 3-2007 Attaks 1-2010 Vector LTX.. sorry no Stinkdoos or poo's cats.
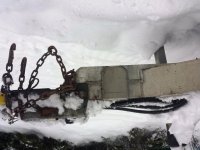
My tonque broke..shocked me. Lucky for me I was going so slow it just dropped in the road..I had to have it towed...It needed lot's of inside tubes for support as well as outside plates and a tube under the oem repaired one. Lot's of weight on this design. They since have changed the design. They use a A coupler at the point of the 3 rails that come together.
Aluminum is nice but will fatique with age and snap
Aluminum is nice but will fatique with age and snap
Attachments
superfan75
TY 4 Stroke Junkie
Nice unit there, handy since any 110 outlet and your in. Mine at 220V 30A single can be a hassle sometimes. Its basically tethered right to its outlet (40 ft lead lets it roll around everywhere and go outside), but there's something to be said for 1/2" steel in a single pass with ease. I have an old 110v Century I bust out for mobile jobs, I can power it off my truck with an inverter and using flux core.
Watch some youtube videos, and then give'r a rip on some scrap, push the puddle and make small swirls and soon you'll be a pro. I imagine you already have some .024 flux core for the mower deck. If you don't already have some, get some anti-spatter gel for the tip and paint the interior of the nozzle with it. Once slag and crap build up in the nozzle and hit the tip, well you aren't welding squat, and it can melt the wire in the tip, so have some extra tips too. Clean the nozzle out frequently and never have to worry about it. Cleanliness is godliness, so become a mig god and clean your surfaces to clean metal so you get excellent penetration and clean welds without impurities.
Still moving along, Thursday was washing the axle and wheels with the Rust Kleen, rinse and dry overnight. Friday was the Rust Blast party of keeping everything wet with the Blast (phosphoric acid) for 60 minutes, rinse and let dry overnight. Saturday saw the Rust Seal application to the wheels and axle. Sunday will see the homestretch of top coating with the Blacktop paint. At this point I just want to put my axle back on!!! I will start a separate thread for the KBS system application and things I found out as I went along with it, like namely how to save $$$ by not buying all the parts of the system.
Yeah that's why I went with the 140 was so I could use it anywhere. Plus my arc welder will take care of anything over the 5/16 that my 140 will do. I played with it yesterday a little with some scrap and I was amazed at how much easier it was to use. I was puttin down some nice looking beads within a few passes. Thanx for the tip on the anti spatter gel, I'll have to get some of that. I have two types of wire right now. I have .35 flux and .25 solid for mig. I was thinking that I would use the .25 mig wire, but from what I've read the flux wire works better for rusty dirty metal. Do you think the .25 flux would be a better choice ? I have the tank for mig welding and everything, but I'm not sure if that's how I should weld it. I didn't end up welding the deck yet so I have some time to figure out the best way to weld it. When I got the deck out yesterday I spent quite a while tearing it down once I realized I should change the spindle bearings. Then I sanded it down and primed it. Maybe within the next day or two I'll weld it up.
nydiver
Lifetime Member
- Joined
- Apr 30, 2015
- Messages
- 373
- Location
- Syracuse, NY
- Country
- USA
- Snowmobile
- 09 Nytro XTX
09 Nytro RTX
91 Phazer II (gotta have a classic / kids bomber :) )
Flux core wire uses an acid (like solder flux) to "cleanse" the metal and therefore helps create a clean and strong weld, but it also impregnates the acid in the metals, so it can possibly eat itself from the inside, plus its a pain to totally clean the weld surface in prep for coating. Mig with gas uses the CO2/Ar mix to expunge the area of air impurities while the weld cools slightly, hence keeping impurities from entering the weld. I've had good luck with either method on sheet metal, I only use solid wire when I switch to .030 or .035, I never use flux core except for sheet metal.
nydiver
Lifetime Member
- Joined
- Apr 30, 2015
- Messages
- 373
- Location
- Syracuse, NY
- Country
- USA
- Snowmobile
- 09 Nytro XTX
09 Nytro RTX
91 Phazer II (gotta have a classic / kids bomber :) )
So finally after almost a week the axle was done being preped then painted with the KBS paint system in an attempt to clean and seal the rust so it may last a long time yet.
9. I go back to my measurement of axle offset (8") and mark it off using painters tape on the frame rails. I now know where I need to set the plates so the axle is aligned and back in the factory position.
10. I made plates out of 5/16" A2 steel to replace the old U-bolt method. This increased the surface area for the clamp and allowed me to be a little further off the frame rails so I could put yet another layer of protection in place, heat shrink tubes over the new grade 8 bolts. All the edges were rounded so they didn't bite into the protection system that was applied to the rails.
11. I put Sanchem No-Ox Special A on all the bolts and assembled my new "u-bolts". These I placed on the deck so I was ready to pull them up once the axle was inplace. I was sure to place the rounded edges toward the frame rail to ensure sharp edges didn't cut into the protection system on the frame rail.
12. The KBS coating was quite hard and required a die grinder to clean out all the holes in my plates and in the axle plate. I then coated the exposed steel with No-Ox in a small attempt to stave off rust starting from them.
Last edited:
nydiver
Lifetime Member
- Joined
- Apr 30, 2015
- Messages
- 373
- Location
- Syracuse, NY
- Country
- USA
- Snowmobile
- 09 Nytro XTX
09 Nytro RTX
91 Phazer II (gotta have a classic / kids bomber :) )
13. I placed the axle plate right up to the mark on both sides. Verifying the mounting holes were exposed on each side of the rail.
14. The "u-bolt" assemblies were brought up thru the plate. A fender washer was used on each bolt to protect the plate from the spinning nut. Be sure to put the rounded shoulder to the plate and the sharp edge of the washer toward the nut, this ensures the washer doesn't press thru the paint and cause a breach for rusting. The washer is used as a thrust bearing to keep the nut from grinding thru the paint and causing a similar issue. Note, I used conical top lock nuts rather than nylocs, why? Because nylocs tend to fail in larger sizes, they can and do vibrate loose. Distorted thread or interference thread lock nuts are much harder to vibrate and fail, they also are unaffected by temperature. Just a FYI.


14. The "u-bolt" assemblies were brought up thru the plate. A fender washer was used on each bolt to protect the plate from the spinning nut. Be sure to put the rounded shoulder to the plate and the sharp edge of the washer toward the nut, this ensures the washer doesn't press thru the paint and cause a breach for rusting. The washer is used as a thrust bearing to keep the nut from grinding thru the paint and causing a similar issue. Note, I used conical top lock nuts rather than nylocs, why? Because nylocs tend to fail in larger sizes, they can and do vibrate loose. Distorted thread or interference thread lock nuts are much harder to vibrate and fail, they also are unaffected by temperature. Just a FYI.
Last edited:
nydiver
Lifetime Member
- Joined
- Apr 30, 2015
- Messages
- 373
- Location
- Syracuse, NY
- Country
- USA
- Snowmobile
- 09 Nytro XTX
09 Nytro RTX
91 Phazer II (gotta have a classic / kids bomber :) )
So a few ideas from doing this:
1. I went over the top to ensure I (crossing fingers) never have to deal with this again. Error to the extreme side of caution here.
2. If my axle bolted straight thru the frame rail I would definitely weld on a plate and do the U-bolt idea again. I work daily with ASTM B117 Salt Fog testing and I can assure you that a bolt thru the rail is not going to be that great even if you could figure out a good isolation system. I know my bolts are going to rust and I pray that being outside with tons of protection layers there that the iron oxide doesn't cancer the aluminum rail, if my bolt were inside the rail I know it would wreck the rail from the inside out.
3. The KBS system was in the end nice and I hope worth the wait for me, it became a 4 day process which seemed forever.
4. I had an epiphany and realized I may have mounted my axle too far back (by maybe an inch or so). My axle fell out and so I measured to where the U-bolts were actually when I measured to the rail break. My 8" should truly be to where the bolt is, not the edge of the axle plate.
While this mess is upside down I noticed the wiring was pretty sketchy too, so I have already started a complete re-wire of the trailer, including the use of a terminal box so when the wiring goes south I can quickly change it out, add more lights to any circuit, and with a spare 10' of twin lead cable and a 3/8 nutdriver in my truck I can fix any wiring issue on the roadside in under 5 minutes.
I ebay'd all new LED lights, not only do they last longer and take road bumps better, but they also lower the power draw from the truck. If you use the chassis of the trailer to pass ground this is a good move on aluminum trailers. I got lazy and did tie my ground to the chassis, but if you can, always run ground to the lights also. The chassis ground then only dissipates transient or static energy, it isn't acting as a wire and creating a potential for electron flow and weakening of the aluminum structure.
I offer up to my new friends of this board: If you need any of the insulation materials, PM me, I will send you any materials you need, gratius (that's free!), just spiff me a little for the shipping to get them to you.
The trailer will be newer than when it left the factory soon.
Last edited:
superfan75
TY 4 Stroke Junkie
Yeah that trailer will be better than when it was new. Awesome job man.
Similar threads
- Replies
- 1
- Views
- 758
-
This site uses cookies to help personalise content, tailor your experience and to keep you logged in if you register.
By continuing to use this site, you are consenting to our use of cookies.